Quick Answer: A CV joint (constant velocity joint) transfers engine power to the wheels while allowing steering and suspension movement. Unlike U-joints, it keeps speed constant even at sharp angles.
- Types: Outboard (Rzeppa) for steering, inboard (tripod) for suspension travel.
- Symptoms: Clicking on turns → outer joint worn. Vibration during acceleration → inner joint worn.
- Repair cost: $250–$750 per side for most cars (parts + labor).
- Maintenance: Inspect rubber boots every oil change. Replace torn boots immediately to save the joint.
A constant velocity joint (CV joint) is a mechanical coupling designed to transmit rotational power between two shafts that are not aligned in a straight line.
The term “constant velocity” means the output shaft rotates at exactly the same angular speed as the input shaft at every instant, without acceleration or deceleration cycles. This property is essential for driven wheels that must steer or move vertically over bumps.
This guide covers CV joint types, failure symptoms, diagnostic methods, replacement procedures, and cost estimates.
What Is a CV Joint?
What Is It and How Does It Work
CV joints solve a problem inherent to universal joints (U-joints). A standard cross-type universal joint produces a speed fluctuation when operating at an angle: the output shaft accelerates twice and decelerates twice per revolution. This fluctuation increases with joint angle, causing vibration, noise, and premature wear.
Practical operating angles for a U-joint are limited to approximately 15–20 degrees. In contrast, a front-wheel-drive vehicle requires steering angles of 40–50 degrees at the wheels. CV joints were developed to enable smooth power transmission at these larger angles.
Inside each CV joint, high-temperature grease fills the internal cavities. Power is transmitted through steel balls (in Rzeppa joints) or rollers (in tripod joints) that roll between precision-machined races. This rolling element design ensures the output shaft maintains constant angular velocity regardless of operating angle, eliminating the speed fluctuation inherent to universal joints.
Main CV Joint Types
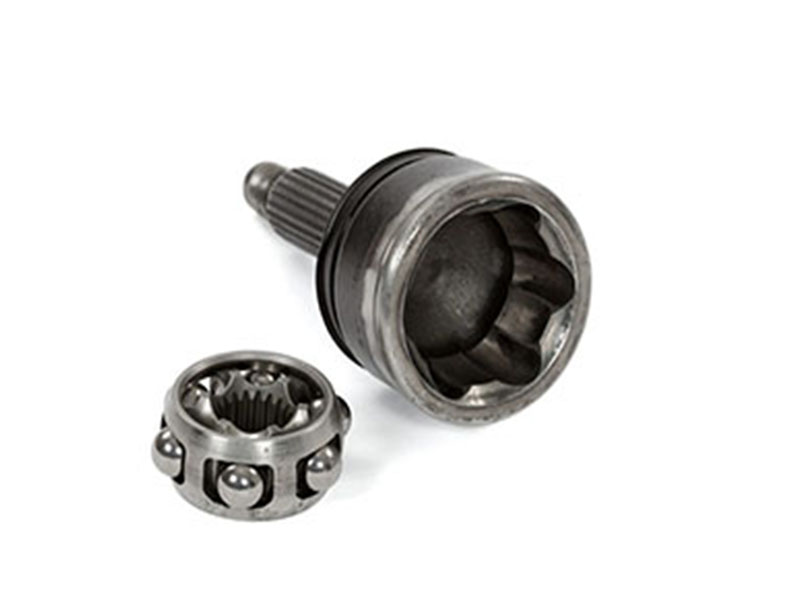
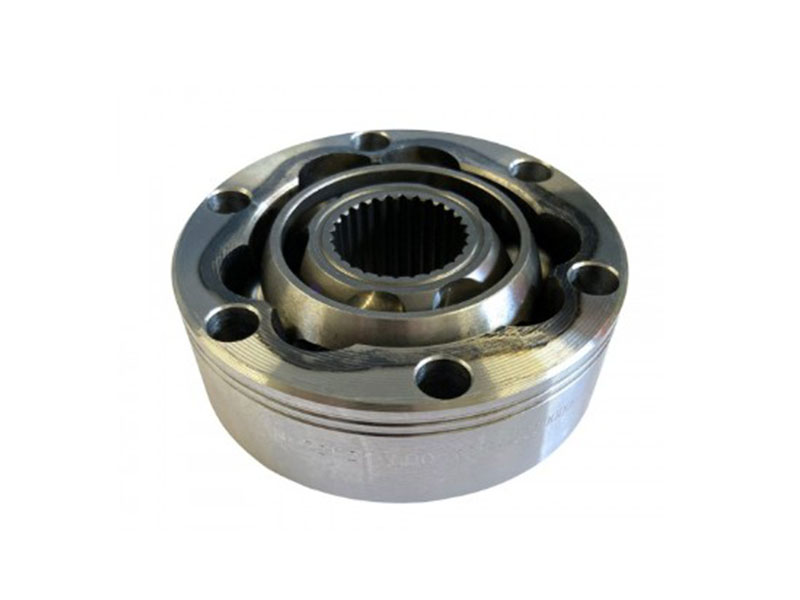
- Outboard CV Joint (Wheel Side) – The Rzeppa joint, introduced in the 1920s by Alfred H. Rzeppa, remains the standard outboard design. An inner race (star) splined to the half‑shaft sits inside an outer housing connected to the wheel hub. Between them, six or eight steel balls transmit torque, held in position by a cage. When the joint articulates, the cage guides the balls into the angle bisector between the two shafts, delivering a 1:1 velocity ratio. Operating angles typically range from 40° to 50°, with specialized variants reaching up to 54°.
- Inboard CV Joint (Transmission Side) – Must allow axial movement (plunging) to accommodate length changes as the suspension compresses and rebounds. The most common design is the tripod (triax) joint, consisting of a three-legged spider with needle-bearing rollers that slide inside straight grooves in the outer housing. This design provides low plunge resistance and high torque capacity. Tripod joints are widely used on vehicles from Nissan, Ford, GM, Toyota, and Honda. Other inboard designs include cross-groove (VL) joints, often found on Audi, BMW, and Mercedes models.
- Other CV joint configurations: Double Cardan joint (two U-joints paired back-to-back, approximates CV behavior, used on lifted trucks and off-road vehicles); Birfield joint (Rzeppa variant for early 4WD front axles); cross-groove (VL) joint (curved ball tracks allowing both articulation and plunge, common on high-torque AWD applications).
CV Joints Are Used in Several Drivetrain Configurations
- Front-wheel drive (FWD): Two half-shafts (left and right), each with an outboard joint at the wheel and an inboard joint at the transmission.
- All-wheel drive / 4WD: Front half-shafts as in FWD, plus rear half-shafts. Rear axles typically use outboard CV joints only.
- Rear-wheel drive with independent rear suspension (IRS): Rear half-shafts with CV joints at both ends to accommodate suspension travel.
- Propeller shafts (selected luxury/SUV models): CV joints incorporated into the main driveshaft to reduce vibration.
CV Joint vs Universal Joint (U-Joint): Key Differences

Understanding the differences between a constant velocity joint and a traditional universal joint helps explain why modern vehicles use CV joints in certain applications while U-joints remain common in others.
The table below summarizes the key technical distinctions.
| Parameter | CV Joint | Universal Joint (U-Joint) |
|---|---|---|
| Output speed variation | None – constant velocity; output speed equals input speed at all times | Cyclic speed fluctuation (two acceleration and two deceleration cycles per revolution) when operating at an angle |
| Maximum operating angle | 40° to 54° (Rzeppa up to 50°, advanced designs up to 54°) | Approximately 15° to 30° before vibration becomes severe |
| Vibration characteristics | Negligible vibration even at high angles | Vibration increases with joint angle; requires phasing or double Cardan design to reduce |
| Manufacturing and replacement cost | Higher (precision grinding, heat‑treated races, ball bearings) | Lower (simple cross and bearing cups, fewer precision components) |
| Maintenance requirements | Sealed, grease‑packed; CV boot is the only wear item. No periodic greasing. | Some are greaseable (with zerk fittings), others sealed; exposed to elements, may require periodic lubrication |
| Torque and strength capacity | High for given size, but limited by ball contact stress; suitable for passenger cars and light trucks | Very high; used in heavy trucks, commercial vehicles, and industrial driveshafts |
| Common applications | Front-wheel drive, all-wheel drive, independent rear suspension, some propeller shafts | Rear-wheel drive driveshafts, truck axles, steering linkage, off-road solid axles |
| Failure mode and repair cost | Usually requires complete half‑shaft replacement; repair cost higher | Joint can be replaced individually; shaft often reusable; repair cost lower |
Summary: Choose a CV joint when the application requires high articulation angles (over 30 degrees), smooth power delivery, and minimal vibration – such as front-wheel-drive vehicles and independent suspensions. Choose a universal joint when the application prioritizes high torque capacity, lower manufacturing cost, and operates within modest angles – such as rear-wheel-drive trucks, commercial vehicles, and solid-axle off-roaders.
Common CV Joint Failure Symptoms
Recognizing early CV joint symptoms can prevent more extensive damage and reduce repair costs. The following symptoms are listed in typical order of progression.
SymptomTypical CauseSeverity LevelClicking or popping noise during low-speed turns (especially full lock)Worn outer Rzeppa joint – ball bearings have created grooves in the raceEarly to moderateGrease splattered inside wheel rim or on suspension armsTorn CV boot – grease leakage and contamination ingressEarly (if no noise yet)Vibration or shudder during acceleration (straight line)Worn inner tripod joint or bent half-shaftModerateClunk when shifting into Drive or ReverseExcessive clearance in splines or internal joint wearModerate to severeContinuous humming or growling that increases with speedJoint severely worn, dry, or contaminated with debrisSevereSteering wheel oscillation or vehicle wanderJoint near separation – unsafe driving conditionCritical
How to Diagnose CV Joint Problems
Road Tests and Inspections
- Reverse circle test: To check the outer joint, drive the vehicle in reverse while turning the steering wheel fully to one side. A louder clicking noise in reverse compared to forward motion indicates outer joint wear on that side.
- Reverse acceleration/deceleration test: With the vehicle moving backward, alternate between pressing and releasing the accelerator. A pronounced clunk or shudder during this maneuver suggests excessive clearance in the inner CV joint.
- Load-sensitive vibration test: If vibration occurs only during acceleration (not while coasting), the issue is driveline-related (CV joint or half-shaft) rather than wheel balance or alignment.
- Steering wheel wiggle test: At very low speed (parking lot), gently wiggle the steering wheel left and right. If the clicking frequency changes with each steering input, the noise originates from the CV joint on the side toward which you are turning.
- Lift and spin inspection: Raise the vehicle and secure on jack stands. Place the transmission in neutral. Rotate each wheel by hand while listening for clicking or grinding from the CV joint area. Also check for excessive axial play by pushing and pulling the half-shaft.
Tips – What to Watch For
- Grease evidence: Grease splattered on the inside of the wheel rim, control arm, or subframe is a clear sign of a torn boot. Address it immediately before the joint fails.
- Clicking frequency: Clicking that speeds up as the vehicle accelerates (in a straight line) is likely a CV joint, but note that a rock in the tire tread or a damaged tire can also produce a similar sound. Check the tires first.
- Temperature effects: In cold weather (near or below freezing), hardened grease can produce clicking or groaning noises during the first few turns after a cold start. These sounds usually disappear after driving a few minutes as the grease warms up.
- Multiple manufacturer technical service bulletins (TSB) from Mitsubishi, Ford, Suzuki, and others explicitly state do not replace CV joints for this condition. If the noise persists after the vehicle reaches normal operating temperature, then true CV joint wear should be suspected.
Diagnosing Confusing Noises – CV Joint vs Wheel Bearing vs Tires
The table below helps distinguish between common noise sources that can be mistaken for CV joint failure.
| Noise Source | Typical Sound | When It Occurs | Identifying Clue |
|---|---|---|---|
| CV Joint | Clicking, popping (during turns); vibration/shudder (during acceleration) | Turning the steering wheel or accelerating | Rhythmic, sharp noise; changes with steering angle or throttle load |
| Wheel Bearing | Continuous hum, howl, scraping sound that gets louder with speed | Straight line driving | Constant pitch; noise may decrease when cornering away from the affected side |
| Tire | Droning, rhythmic slapping or block-pattern noise | Straight line driving | Frequency changes with vehicle speed; sound changes after tire rotation |
| Brake | Metallic scraping or squealing | When brake pedal is pressed | Noise appears or disappears when brake is applied; often wheel-speed dependent |
CV Joint Replacement: Options and Costs
OE Original Equipment vs New Aftermarket vs Remanufactured
When CV joint replacement becomes necessary, vehicle owners and repair shops have three main choices. The table below compares these categories.
| Part Type | Pros | Cons |
|---|---|---|
| OE original equipment | Exact fit, known metallurgy, longest service life, minimal vibration | Highest cost (often 2–3 times aftermarket) |
| New aftermarket (including many from Chinese suppliers) | Affordable, improved boot materials (TPE), widely available, many with lifetime warranty | Quality varies by supplier; some may have imbalance or missing circlips |
| Remanufactured (rebuilt) | Lowest cost | Risk of poor cleaning, incorrect grease, mismatched components, early failure |
For quality and reliability, OE original equipment is the recommended choice.
For budget-conscious repairs, new aftermarket joints (including many from Chinese suppliers) offer the best value for daily driving. However, quality control can vary; some users report vibration on acceleration or missing circlips.
For normal passenger vehicles, a new aftermarket CV joint from a known distributor is usually sufficient. For AWD vehicles, towing applications, or performance builds, OE joints are strongly recommended to reduce the risk of premature failure under higher stress loads.
Estimated Replacement Costs
Estimated replacement costs (USD, parts and labor, 2025 reference):
| Repair Type | Total Cost Range |
|---|---|
| Replace CV boot only (joint intact, no noise) | $170 – $360 |
| Replace individual CV joint (less common) | $260 – $600 |
| Replace one complete half-shaft (single side) | $250 – $750 |
| Replace both front half-shafts (pair) | $500 – $1,400 |
| Luxury or performance vehicle (one side) | $550 – $1,200 |
Note: Actual costs vary by vehicle model, local labor rates ($80–$200 per hour), and parts availability. Obtain written estimates from multiple repair shops before proceeding.
CV Joint Replacement: DIY Guide
Can I replace a CV joint myself?
Experienced DIY mechanics can replace a CV joint with moderate difficulty (rated approximately 3 out of 10 on professional scales). Time required: 1.5 to 2 hours per side.
Basic mechanical knowledge and proper tools are necessary. If you have never worked on suspension or drivetrain components, professional installation is recommended.
How to replace a CV joint – key steps
Required tools: Floor jack and jack stands (mandatory for safety), socket set and breaker bar (24‑inch minimum for axle nut), torque wrench, CV joint puller or slide hammer (strongly recommended), ball joint separator or pickle fork, dead blow hammer, pry bar, safety glasses, and gloves. Many auto parts retailers offer free loaner tools.
- Loosen the axle nut while the vehicle is on the ground (wheels chocked).
- Raise the vehicle and support securely on jack stands. Remove the wheel.
- Remove the axle nut and discard it – always install a new nut.
- Disconnect the lower ball joint or separate the control arm to free the steering knuckle.
- Use a slide hammer to pull the inboard joint out of the transmission or differential. Avoid prying against the transmission case.
- Remove the old CV joint or half-shaft. Compare the new joint for correct fitment, spline count, and ABS tone ring (if equipped).
- Clean the transmission seal area and check for leaks.
- Install the new CV joint: align the circlip (position it at 12 o’clock), push firmly until it clicks into place.
- Reassemble suspension components, install a new axle nut, and torque to manufacturer specification.
- Lower the vehicle, top up transmission fluid if any was lost, and perform a test drive.
Critical warnings:
- Never let the half‑shaft hang from the differential or transaxle at any time during installation – support it to prevent damage to the new boot and inboard joint.
- Do not reuse a self‑locking axle nut; its prevailing torque is lost after removal.
- If the inboard joint does not seat fully, driving can dislodge it, causing sudden loss of drive.
- After replacement, check the transmission fluid level (especially on vehicles where the axle stub passes through a seal).
Replace entire half-shaft vs replace boot only
If a boot is torn but the joint makes no noise and no contamination has entered, replacing the boot and repacking with fresh grease can save the joint. However, if dirt has already entered or clicking is present, the joint is already damaged and only replacing the entire half‑shaft assembly will resolve the issue.
For most DIYers, replacing the complete half‑shaft is simpler and more reliable than attempting to disassemble, clean, and reboot an old joint.
Does a CV joint replacement require a wheel alignment?
No – replacing a CV joint or half‑shaft does not affect toe, camber, or caster angles because no alignment components are adjusted during the procedure.
However, if suspension bolts (control arms, tie rods) were loosened to access the joint, an alignment check is prudent. Test drive for pulling or off‑center steering after replacement.
CV Joint Maintenance and Life Extension
Theoretical Lifespan of CV Joints
Under ideal conditions with intact boots and proper lubrication, CV joints can last beyond 150,000 miles (approximately 240,000 kilometers).
Most CV joints last between 80,000 and 100,000 miles under normal driving conditions. However, several factors significantly affect this lifespan:
- Boot integrity: A torn boot allows grease to escape and contaminants to enter. Once this happens, the joint often fails within 500 to 5,000 miles.
- Driving habits: Aggressive acceleration, frequent full-lock turns, and driving on rough roads accelerate wear.
- Suspension modifications: Lifted vehicles increase CV joint operating angles, reducing lifespan considerably.
- Environmental conditions: Salt, sand, and extreme temperatures degrade boots faster.
Some vehicle manufacturers recommend CV joint inspection as part of scheduled maintenance at 100,000 to 150,000 mile intervals. For vehicles used in harsh environments (off‑road, salted roads, extreme temperatures), more frequent inspection (every 30,000 miles) is advised.
Maintenance Recommendations
CV joint maintenance focuses almost entirely on the protective boot. The joint itself requires no periodic service as long as the boot remains intact.
Inspection schedule:
- Inspect CV boots during every oil change or tire rotation (every 5,000 to 7,500 miles).
- For vehicles with lifted suspensions, inspect boots every 3,000 miles.
What to look for:
- Cracks, brittleness, or pinch marks in the rubber folds.
- Grease splattered on the inside of the wheel rim, control arm, or subframe.
- Loose or missing boot clamps.
Action steps:
- If a boot is cracked but the joint makes no noise, replace the boot and repack with fresh grease immediately. This can save the joint from failure.
- If clicking or vibration is already present, the joint is damaged. Replacing the boot alone will not fix it – replace the entire half‑shaft assembly.
- For lifted vehicles, consider high‑angle CV joints (e.g., off‑road rated Rzeppa or double Cardan designs).
Note: Lifting a vehicle typically voids the factory warranty on CV joints. After suspension modifications, shortened inspection intervals become essential.
Conclusion
The CV joint is a fundamental component of modern front-wheel-drive, all-wheel-drive, and independent rear suspension systems. Its ability to transmit power at constant velocity across high angles enables smooth steering and ride quality that universal joints cannot provide.
The most common cause of CV joint failure is a torn boot, making regular visual inspection the single most effective maintenance practice.
When replacement becomes necessary, OE original equipment delivers the highest reliability, while new aftermarket joints from reputable Chinese suppliers offer the best value for daily drivers.
By understanding CV joint types, recognizing early symptoms, and following proper diagnostic and replacement procedures, both professional technicians and vehicle owners can ensure drivetrain reliability and avoid unexpected failures.
Frequently Asked Questions (FAQ)
Q: Can a bad CV joint cause the check engine light to turn on?
A: No. The check engine light monitors electronic engine and emission systems. A failing CV joint is purely mechanical and does not generate diagnostic trouble codes. Visual and auditory inspection are required.
Q: How long can I drive with a clicking CV joint?
A: Continued driving is not recommended. Clicking indicates metal-to-metal wear. The joint can fail suddenly, leading to loss of power to that wheel and potential transmission damage. Replacement should be scheduled immediately.
Q: Should both CV joints be replaced at the same time?
A: Not automatically. Replace only the faulty side if the other side shows no boot cracks or noise. However, on vehicles with high mileage (over 100,000 miles), many mechanics recommend replacing both to avoid a repeat repair in the near future.
Q: Is a wheel alignment necessary after CV joint replacement?
A: Not required if only the joint and ball joint were disconnected without adjusting tie rods or control arm bolts. If suspension bolts were loosened, an alignment check is prudent. Test drive for pulling or off-center steering after replacement.
Q: Why does a new aftermarket CV joint cause vibration at highway speeds?
A: Poorly manufactured or remanufactured joints may have imbalance, incorrect grease, or mismatched components. This condition is distinct from tire imbalance (which is speed-dependent but not load-sensitive). Replacing with a higher-quality joint (OE or premium new aftermarket) usually resolves the issue.
Q: Are CV joints on AWD vehicles more expensive to replace than on FWD vehicles?
A: Typically yes. AWD vehicles have four half-shafts (two front, two rear) and often require additional labor for rear axle access. Some AWD systems also demand precise matching of shaft lengths and spline counts, limiting aftermarket options.
Q: What is the function of a CV boot, and when should it be replaced?
A: The CV boot seals the joint, keeping grease inside and excluding dirt and water. Rubber boots degrade over time; inspect for cracks every oil change. If a boot is torn but the joint makes no noise, replace the boot and repack with fresh grease immediately. For boot material options: standard rubber (neoprene) is OE but ages faster; TPE offers better oil/ozone resistance; silicone provides extreme temperature tolerance but costs more. Use the material that matches your driving conditions.
Q: What type of grease is required for CV joints, and why can’t I mix greases?
A: Outboard (Rzeppa) joints require molybdenum disulfide (MoS₂) grease (3‑5% moly, dark gray/black). Inboard (tripod) joints require non‑moly polyurea or lithium grease. MoS₂ in a tripod joint can cause roller skidding and flat‑spotting. Never mix greases – different thickeners and additives may be incompatible, causing liquefaction or hardening and rapid joint failure. Always use the grease supplied with a new CV joint or the vehicle manufacturer’s specification.
Q: I bought a new CV joint, but it looks longer/shorter than the old one. Is it the wrong part?
A: Not necessarily. The inboard CV joint can slide in and out (plunging). If the old joint was overextended during removal, it will appear longer. Compare both joints in their fully compressed state – lengths should match. Also verify spline count, ABS tone ring teeth, and overall compressed length against the original part number. If the new joint is genuinely different after compression comparison, return it.
Q: Do mismatched tire sizes accelerate CV joint wear?
A: Yes, especially on AWD/4WD vehicles. Different rolling circumferences force the driveline to constantly compensate, increasing stress on inboard CV joints and the center differential.
Q: Is a double Cardan joint considered a true CV joint?
A: Technically no. A double Cardan joint approximates constant velocity but still has minor residual velocity ripple. In off-road and lift kit contexts, it is often called a “CV-style joint,” but its smoothness is inferior to a Rzeppa or tripod joint.
Q: Do new CV joints require a break-in period?
A: No formal break-in is required. However, avoiding full-lock turns and full-throttle acceleration for the first 100 to 200 miles allows the grease to distribute evenly across the rolling elements.


