Quick Answer: How to Tell If Your CV Joint Is Bad
If your car clicks when turning, clunks during acceleration, or vibrates only under load, the CV joint is likely failing.
– Clicking on turns → outer joint worn.
– Clunking on acceleration → inner joint worn.
– Grease on wheel or suspension → torn boot.
Once noise appears, replace the entire axle. Driving with a bad CV joint risks sudden axle separation and transmission damage.
A clicking noise when turning or a clunking sound during acceleration often indicates a failing constant velocity (CV) joint. These drivetrain components transfer power from the transmission to the wheels while accommodating suspension travel and steering angles. Recognizing the symptoms early, knowing how to diagnose the problem correctly, and understanding your repair options can prevent extensive drivetrain damage and unexpected breakdowns.
What Is a CV Joint?
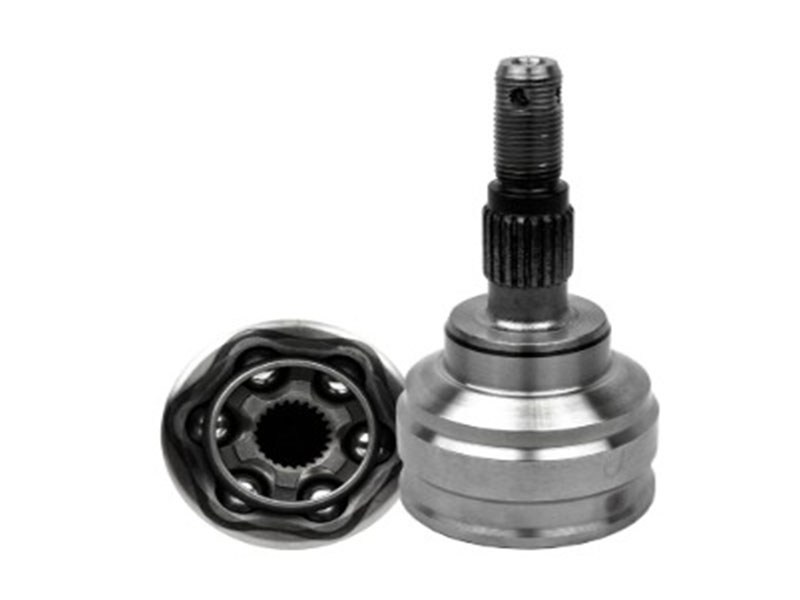
A constant velocity (CV) joint is a mechanical component at each end of a drive axle. It transmits torque from the transmission to the wheels while allowing suspension movement and steering. Unlike conventional universal joints (U‑joints), which produce velocity fluctuations when operating at an angle, CV joints maintain a constant rotational speed regardless of angle.
Outer CV Joint
The outer CV joint sits at the wheel hub. It handles steering angles and high torsional loads during cornering. Wear typically becomes noticeable during low‑speed turning, such as in parking lots or driveways.
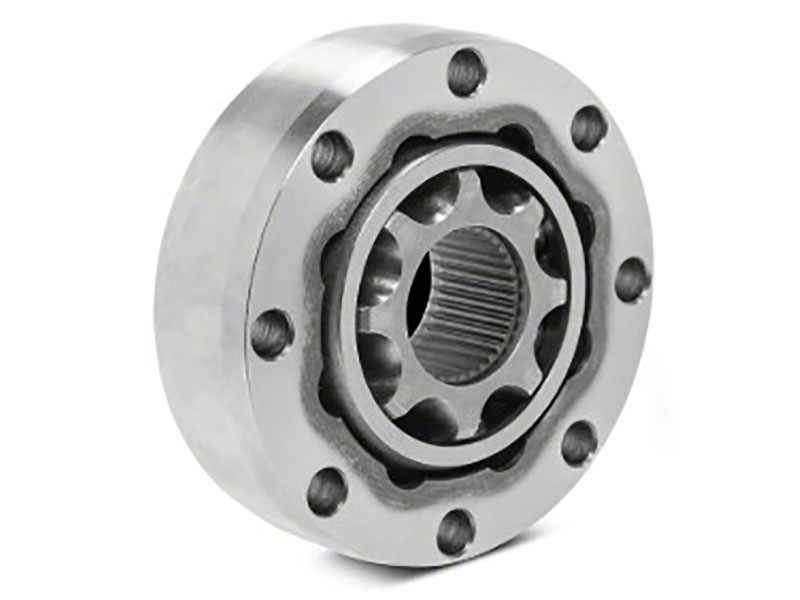
Inner CV Joint

The inner CV joint attaches to the transmission or differential. It is a plunge joint that can slide in and out, allowing the axle length to change as the suspension compresses and extends. Issues with the inner joint usually appear under acceleration or deceleration loads.
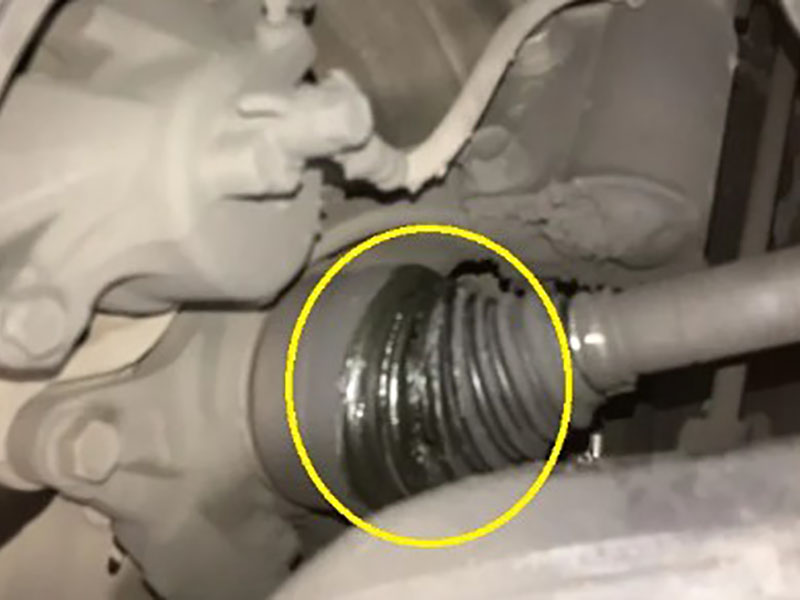
CV Boot
The CV boot is a rubber or thermoplastic cover filled with specialized grease. It is the first line of defense against contaminants. When the boot tears or cracks, grease escapes and road debris, water, and salt enter the joint. Boot failure is the most common cause of premature CV joint failure.
CV Joints vs. Universal Joints – Engineering Context

Universal joints transmit average rotational speed but fluctuate twice per revolution at an angle, producing vibration. This makes them unsuitable for front‑wheel‑drive applications requiring high steering angles. CV joints transfer torque with zero angular velocity variation and near‑zero vibration at greater angles, enabling modern front‑wheel‑drive vehicles.
Bad CV Joint Symptoms
CV joint failure follows a predictable sequence. Recognizing the specific noise or vibration helps identify which joint is failing.
SymptomTypical PresentationLikely Failure PointClicking or popping when turningRhythmic click‑click‑click during low‑speed full‑lock turns, worse with accelerationOuter CV jointClunking on accelerationDull thud or bang when accelerating from a stop or uphillInner CV jointClunking on decelerationImpact sound when releasing throttle or shifting into Drive/ReverseInner CV joint (excessive clearance)Vibration under accelerationSteering wheel or floorboard shake during acceleration, especially from a stopInner CV joint (loss of balance)Grease leakageBlack grease on wheel interior, control arms, or steering knucklesTorn CV boot (earliest indicator)
Clicking or Popping When Turning
This is the most characteristic sign of a failing outer CV joint. The sound occurs during sharp turns at low speed—parking lots, driveways, or roundabouts. The clicking intensifies with steering angle and throttle application. Reversing in a circle often makes the noise louder.
Clunking on Acceleration or Deceleration
A dull clunk when accelerating from a stop or shifting into reverse points to inner joint wear. This indicates excessive internal clearance or a failing plunge mechanism. The noise may also occur when quickly releasing the throttle.
Vibration Under Acceleration
Shuddering that appears only under acceleration—especially from a stop or uphill—indicates the inner joint has lost rotational balance. Unlike tire imbalance (speed‑dependent), CV joint vibration is load‑dependent: it occurs when torque is applied and often subsides during coasting.
Grease Leakage
Visible grease around the inner wheel area or on suspension parts confirms a torn CV boot. If caught early (before extensive grease loss), boot replacement may save the joint. If leakage has persisted, the joint is likely already damaged and requires axle replacement.
Other Symptoms
- Turning difficulty: Advanced wear can impede power transfer, making steering feel heavy.
- Rear axle humming: On RWD or AWD vehicles, worn rear CV joints may produce a deep hum or rumble under acceleration.
- Torque steer: The vehicle pulls to one side under hard acceleration due to uneven drive force from a worn outer joint.
- Clunking on rough roads: Excessive inner joint clearance may cause a loose rattling sound on uneven pavement.
How to Diagnose a Bad CV Joint
Visual Inspection
Turn the steering wheel to full lock in both directions. Inspect each CV boot for:
- Cracks, tears, or pinholes
- Grease splattered on suspension components or wheel wells
- Dried, crusted residue around the joint
A torhas enteredn boot without noise or vibration may still allow boot‑only replacement. However, if contamination , the joint is likely compromised.
Road Test – Distinguishing Inner vs. Outer Joints
To check a worn outer CV joint:
- Find an empty parking lot.
- Turn the steering wheel fully to one side.
- Drive slowly forward in a circle. Listen for rhythmic clicking or popping.
- Repeat with the wheel turned to the opposite side.
- Perform the test in reverse (often produces a louder click).
Clicking on turns almost always indicates outer CV joint wear. The noise comes from the outer wheel on the opposite side of the turn direction (turning left loads the right outer joint).
To check a worn inner CV joint:
- On a safe straight road, accelerate firmly from a complete stop.
- Listen for a dull clunk when drivetrain load is applied.
- At moderate speed, quickly release the throttle and listen for clunking during deceleration.
- If accessible, drive in reverse while alternating acceleration and deceleration.
Vibration during acceleration, especially from a stop, strongly suggests inner joint wear. Clunking during gear engagement or throttle transitions also points to inner joint deterioration.
Lift inspection confirmation:
With the vehicle on a lift, grasp the axle shaft near the transmission end and attempt to move it side to side. Excessive rotational play or axial movement confirms inner joint failure.
Excluding Other Faults – Avoiding Misdiagnosis
| Misdiagnosed Issue | How to Differentiate |
|---|---|
| Wheel bearing noise | Low‑pitched humming/growling, changes with speed, may disappear when turning one direction. CV noise is rhythmic clicking. |
| Engine mount failure | Clunking occurs regardless of wheel rotation. CV noise is tied to axle rotational frequency. |
| Tire imbalance | Vibration at constant highway speeds (60+ mph). CV vibration is load‑dependent (acceleration only). |
| Suspension ball joint | Single pop or clunk when turning, not repetitive. A bad CV joint produces rhythmic noise with each wheel revolution. |
Temperature‑Related Noise – A Diagnostic Note
Cold weather can cause CV joints to click without actual wear. Grease thickens in low ambient temperatures (typically below 5°C / 41°F), temporarily affecting smoothness until the joint warms up.
Key distinction:
- Harmless: Clicking occurs only during the first few minutes of driving in cold weather and disappears after several miles.
- Concerning: Clicking persists after the vehicle is fully warmed up, or occurs regardless of temperature.
Cold‑induced clicking does not damage CV joints. No replacement is needed for this condition.
Driving Risks and Safety Considerations
Complete joint failure
In a worst‑case scenario, the joint can fail completely, causing the axle to separate from the transmission. The vehicle may lose drive power to that wheel, and the detached axle can damage brake lines, exhaust components, or underbody structures, potentially leading to loss of control.
Transmission damage
Vibrations from a failing CV joint transmit through the drivetrain, stressing internal components. Over time, this can cause irregular wear, gear engagement issues, or significant transmission damage.
How long can you drive?
There is no fixed distance. Some vehicles continue for hundreds of miles; others fail within 50 miles. The point of complete failure cannot be predicted. Any CV joint producing sustained noise or vibration should be inspected and replaced promptly.
Recommendation
Once consistent clicking on turns or vibration under acceleration appears, schedule replacement as soon as practical. Delaying risks axle separation and more extensive drivetrain damage.
Common Premature Failure Causes & Installation Errors
CV joints rarely fail without external contributing factors. Understanding these mechanisms helps avoid repeat failures after replacement.
Boot‑Related Failures (Most Common)
A torn, cracked, or leaking boot is the number one cause. Even a small pinhole allows grease to escape due to centrifugal force. Contamination from road grit and water then accelerates internal wear.
Axle Misalignment & Suspension Geometry Issues
Misaligned subframes or engine mounts alter joint geometry. The outer joint may exceed its maximum operating angle, or the inner plunge joint may bottom out or pull out. This is especially common in lifted trucks. Factory axles run nearly flat (–1° to +1°). A 2–5 inch lift can increase angles to 10–14° or more, significantly accelerating wear.
Incorrect Axle Selection
Differences in length between manual and automatic transmission axles (sometimes only a few millimeters) can cause a plunge joint to be too shallow or too deep. An axle that is too long may bottom out; one that is too short may pull out under certain conditions.
Installation tip: Always verify axle specifications against the vehicle’s exact transmission type before installation.
Improper Torquing of the CV Joint Nut
Incorrect tightening—too loose or overtightened—can cause premature failure. Always use a torque wrench and follow manufacturer specifications. Many vehicles require a new nut (single‑use stretch fastener).
Excessive Grease Quantity
Adding too much grease increases internal pressure, potentially causing boot failure or seal damage. Follow the quantity specified by the joint or axle manufacturer.
Bent Suspension Components
After a CV joint fails, inspect surrounding suspension. Bent steering arms or strut rods can alter the joint’s range of motion, accelerating wear on replacement parts.
Preventive Maintenance & Inspection Intervals
Recommended Inspection Frequency
| Driving Condition | Inspection Interval |
|---|---|
| Standard (paved roads, normal traffic) | Every 10,000–15,000 miles or 12 months |
| Severe (unpaved roads, heavy traffic, extreme climates) | Every 5,000–7,500 miles or 6 months |
| High‑mileage vehicles (120,000+ miles) | More frequent (boots become brittle with age) |
What to Inspect
The CV boot is the critical inspection point. Although a CV joint requires no maintenance as long as the boot remains intact, frequent boot inspection is essential.
Inspection steps:
- Turn steering wheel to full lock in both directions.
- Visually examine each CV boot for:
- Cracks, splits, or pinholes
- Grease seepage or wetness around boot folds
- Grease splattered on nearby suspension components
- Signs of boot clamp loosening
Early Intervention Window
If a torn boot is detected while the joint is still silent (no clicking, popping, or vibration), immediate boot replacement may preserve the CV joint. Once noise appears, the internal bearings and raceways have already sustained wear, and boot replacement alone is insufficient.
Grease Specification Note
Quality CV joint grease is formulated for extreme pressure and wide temperature range. NLGI Grade 2 lithium complex grease with 1–5% molybdenum disulfide (MoS₂) and extreme‑pressure (EP) additives is the industry standard. Using non‑specification grease may cause inadequate lubrication, thermal breakdown, or compatibility issues.
Vehicle‑Specific Considerations
Some manufacturers require a centering procedure that involves loosening motor mounts when installing new axles. Always consult vehicle‑specific service information.
Repair Guide: Boot vs. Axle Replacement
Boot‑Only Replacement – When It Works
Replacing only the CV boot is feasible only under specific conditions:
- The boot has torn recently (grease still present, no visible contamination)
- The joint is completely silent (no clicking, popping, or vibration)
- The joint has not been exposed to road grit or water
If these conditions are met, removing the axle, cleaning the joint, repacking with fresh grease, and installing a new boot can restore the joint. However, the labor required is nearly as high as replacing the entire axle. For vehicles with moderate to high mileage, full axle replacement is often more cost‑effective.
Do not attempt boot‑only replacement if: clicking or vibration is already present. Internal damage has occurred, and the joint will fail again shortly.
Complete Axle Replacement – Standard Practice
Once a CV joint produces clicking, clunking, or vibration, replacing the entire axle assembly is the industry standard. A complete replacement includes:
- A new or remanufactured CV joint (both inner and outer)
- A new CV boot
- A new axle shaft
Benefits of complete axle replacement:
- Eliminates all wear‑related issues at once
- Provides a new boot (no risk of hidden boot damage)
- Typically carries a warranty
- Labor time is similar to boot replacement
Replace One Axle or Both?
CV axles do not require replacement in pairs (unlike tires or brake pads). Replace only the failed side when:
- The opposite side has no torn boot, noise, or vibration
- The vehicle has moderate mileage (under 100,000 miles)
Replace both axles together when:
- The vehicle has high mileage (over 120,000–150,000 miles) and both axles show similar wear
- The opposite side already has a torn boot or early symptoms
- Labor cost is similar, making simultaneous replacement economical
- The vehicle is all‑wheel‑drive, where matched axle condition is more critical for drivetrain harmony
Cost Considerations
| Vehicle Type | Typical Cost (Parts + Labor) |
|---|---|
| Standard front‑wheel drive | $250 – $600 per axle |
| AWD or luxury European models | $800 – $1,500 per axle |
Parts options:
- OEM (original equipment): Best fit, highest durability, highest cost
- Aftermarket new: Good quality for standard vehicles, lower cost
- Remanufactured: Rebuilt with new wear parts; acceptable for many passenger cars; avoid for high‑torque or AWD applications
Post‑Replacement Considerations
Axle nut torque: The axle nut must be tightened to manufacturer specifications using a torque wrench. Overtightening with an impact wrench can damage wheel bearings or the CV joint. Many vehicles require a new axle nut (single‑use stretch fastener).
Axle seal inspection: While the axle is removed, inspect the transmission output shaft seal for leaks. Replacing the seal at this time adds minimal cost versus a separate repair later.
Alignment check: CV axle replacement does not directly affect wheel alignment. However, if suspension components such as tie rods or ball joints were loosened during the repair, an alignment is recommended. Incorrect alignment can accelerate wear on new CV joints and tires.
Conclusion
A failing CV joint typically announces itself through distinctive symptoms: clicking on turns, clunking on acceleration, or vibration under load. Recognizing these signs early and correctly distinguishing between inner and outer joint failure allows for timely diagnosis. Routine CV boot inspection at regular intervals (every 10,000–15,000 miles) is the most effective preventive measure. Catching a torn boot before the joint begins making noise can preserve the joint and avoid a full axle replacement.
Once a CV joint produces persistent noise or vibration, replacement of the affected axle is the standard repair. Boot‑only replacement is rarely advisable once wear symptoms appear. Complete axle replacement—whether with OEM, aftermarket, or remanufactured parts—restores proper power transfer, eliminates noise and vibration, and ensures drivetrain reliability. With proper diagnosis and timely repair, drivers can avoid unsafe conditions and more extensive drivetrain damage.
Frequently Asked Questions (FAQs)
Q1: How do I tell the difference between CV joint noise and wheel bearing noise?
A: CV joint noise is a rhythmic clicking or popping during turns, varying with wheel rotation. Wheel bearing noise is a low‑pitched, continuous humming or growling that changes with speed and may disappear when turning one direction. A torn CV boot with grease leakage is a clear indicator of CV joint issues.
Q2: What does “vibration only when accelerating” indicate?
A: It strongly indicates inner CV joint wear. The inner joint has lost rotational balance and cannot transfer power smoothly under load. If the vehicle does not vibrate when coasting at constant speed, tire balance issues can be ruled out.
Q3: Why does my car make a clicking noise only when reversing?
A: Possible causes include a failing CV joint under reverse load, a bent brake dust shield contacting rotating parts, or excessive differential gear clearance. Inspect CV boots and road‑test in both forward and reverse to isolate the source.
Q4: Is a clicking CV joint always urgent?
A: Not always. If clicking occurs only during the first few minutes of driving in cold weather and disappears as the vehicle warms up, it is likely harmless. See the “Temperature‑Related Noise” section for the distinction.
Q5: Should I replace both CV axles at the same time?
A: No. CV axles do not need to be replaced in pairs. See the “Replace One Axle or Both?” section for detailed guidance.
Q6: Are remanufactured CV axles as reliable as new OEM parts?
A: Quality varies. Premium remanufactured units work well for standard passenger vehicles. For AWD, high‑torque, or towing applications, new OEM axles are recommended for longer durability.
Q7: What else should I replace when doing a CV axle job?
A: Replace the axle nut (often single‑use). Inspect the transmission output shaft seal for leaks. If the wheel bearing has high mileage, consider replacing it while the axle is removed.
Q8: Do I need an alignment after replacing a CV axle?
A: Not required unless suspension components were loosened. However, having alignment checked is recommended because incorrect alignment can accelerate wear on new CV joints and tires.
Q9: What is the average cost to replace a CV axle?
A: See the “Cost Considerations” section for a detailed breakdown by vehicle type.
Q10: How long can I drive with a bad CV joint?
A: No fixed distance. See the “How long can you drive?” paragraph in the “Driving Risks and Safety Considerations” section.
Q11: Can a bad CV joint cause transmission damage?
A: Yes. Vibrations stress the transmission and differential. If the joint fails completely, debris can damage the output shaft seal or internal gears.
Q12: Is it safe to drive with a torn CV boot?
A: No. Even without noise, the joint will wear rapidly as grease escapes and contaminants enter. If caught early, boot replacement may save the joint. If noise has already started, full axle replacement is required.
Q13: How often should I inspect CV boots?
A: Every 10,000–15,000 miles or annually. For severe conditions (unpaved roads, heavy traffic, extreme climates), inspect every 5,000–7,500 miles or every six months.


