Quick Answer: Should you buy a wheel bearing or a hub assembly?
– Most vehicles built in the last ten years use a bolt‑on hub assembly (Gen 2 or Gen 3).
– Check your existing part: if it has a flange with bolt holes that attach directly to the steering knuckle, buy a bolt‑on assembly.
– Press‑in bearings (Gen 1) are typically for older cars or heavy‑duty trucks.
– A quality hub assembly typically lasts 100,000–160,000 km (60,000–100,000 miles).
A worn wheel bearing or hub assembly can cause anything from a low‑frequency hum to unsafe steering. But choosing the right replacement is not always straightforward. Should you buy a separate press‑in bearing (first generation) or a complete bolt‑on hub assembly (second or third generation)? What makes a quality part, and how do you know when it is time to replace one?
This guide answers those questions. It explains the differences between wheel bearings and hub assemblies, describes the three generations of hub units, and gives practical advice on diagnosis, selection, and purchase – without unnecessary marketing claims.
What Are a Wheel Bearing and a Hub Assembly?
The wheel bearing allows the wheel to rotate with minimal friction while supporting the vehicle’s weight. It also withstands axial loads generated during cornering. In older vehicle designs, the bearing is a separate component pressed into the steering knuckle.
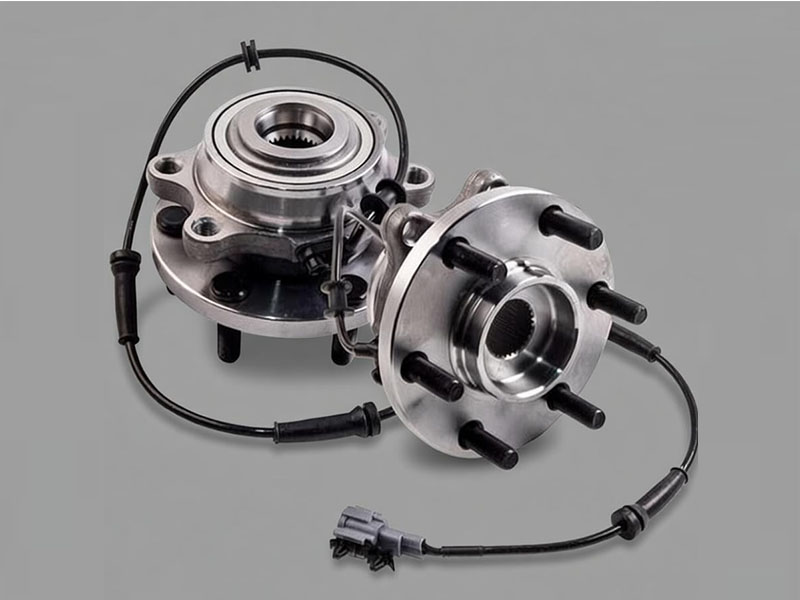
A hub assembly (also called a wheel hub assembly or hub unit) integrates the bearing, wheel hub, flange, mounting bolts, and often an ABS sensor into a single unit. Most modern passenger cars use a hub assembly rather than a loose bearing. The key difference is that first‑generation parts are simple “wheel bearings”, while second‑ and third‑generation parts are “wheel hub assemblies”.
Three Generations of Wheel Bearings and Hub Assemblies
The evolution of wheel bearings is best understood by tracing how the industry moved from two separate bearings to fully integrated hub units.
Before the first generation became standardized, the earliest wheel bearing designs consisted of two separate single-row radial ball bearings or two separate single-row tapered roller bearings mounted in pairs. These were not pre-assembled or pre-lubricated. Technicians had to pack grease into each bearing and adjust the clearance manually during installation on the production line.
Gen 1 – First-generation hub bearing. The first generation represented a significant consolidation. The outer rings of two single-row bearings were integrated into a single outer ring, creating a pre-assembled, pre-greased, and pre-sealed cartridge unit. The entire assembly arrived as one piece from the factory. Mounting still required a hydraulic press, but the manufacturer had already set the internal clearance and applied the correct amount of grease. Gen 1 hub bearings are available in two rolling-element configurations: ball (angular contact) and tapered roller.
Gen 2 – Second-generation hub assembly. The Gen 2 design added a flange to the outer ring. This flange replaced the separate wheel hub that was previously pressed onto the bearing, reducing parts count and simplifying chassis design. Gen 2 units are typically used on non-driven wheels. The flange included threaded holes or studs to mount the brake disc and wheel directly.
Gen 3 – Third-generation hub assembly. This generation introduced a double-flange design – a flange on the outer ring for suspension attachment and a flange on the inner ring for wheel and brake mounting. The outer ring bolts directly to the steering knuckle, eliminating any press-fit step. Gen 3 units also integrate the ABS wheel speed sensor (magnetic encoder ring) as standard equipment, making them the most convenient and reliable choice for modern vehicles.
| Generation | Common name | Structural characteristic | Mounting method |
|---|---|---|---|
| Gen 1 | Wheel bearing | Two single-row bearing outer rings integrated into one; pre-greased and sealed; ball or tapered roller | Press‑fit (requires hydraulic press) |
| Gen 2 | Hub assembly | Outer ring integrated with flange for wheel/brake mounting | Bolt‑on + light interference fit |
| Gen 3 | Hub assembly | Double flange (outer for suspension, inner for wheel); ABS sensor integrated | Fully bolt‑on |
If your vehicle was built in the last ten years, it almost certainly uses a Gen 3 hub assembly.
What to Consider Before Buying
This section covers all the decisions you need to make before ordering a replacement: identifying your vehicle’s bearing type, checking compatibility, evaluating quality, and deciding between a basic part or a full kit.
Press‑In Bearing vs. Bolt‑On Hub Assembly – Which One Does Your Vehicle Need?
The first and most important step is to determine whether your vehicle uses a press‑in bearing (Gen 1) or a bolt‑on hub assembly (Gen 2/3).
- Press‑in bearing (Gen 1) – Lower part cost, but installation requires a hydraulic press and careful handling. Incorrect pressing can damage the bearing or alter internal clearance, leading to premature failure. These are still found on some older or heavy‑duty vehicles.
- Bolt‑on hub assembly (Gen 2/3) – Higher part cost, but installation is straightforward – unbolt the old unit from the steering knuckle and bolt on the new one. No press is needed. For most owners, the bolt‑on hub assembly is the better choice because it guarantees correct internal geometry and saves labour time.
How to identify which one your vehicle needs – Look at the existing part. If it has a flange with bolt holes that attach directly to the steering knuckle, you need a bolt‑on hub assembly (Gen 2 or 3). If the bearing itself is pressed into the knuckle and the hub is separate, you need a press‑in bearing (Gen 1).
Important installation note – Use a torque wrench when installing any hub assembly or bearing. Impact wrenches can overtighten the axle nut. Excessive torque reduces internal clearance and creates unwanted preload, forcing the rolling elements to run under high friction. This generates excess heat, accelerates fatigue, and shortens bearing life. Follow the vehicle manufacturer’s torque specification exactly. Do not use an impact gun for final tightening.
Compatibility
The replacement part must match your vehicle’s make, model, year, and drivetrain (front‑wheel drive, rear‑wheel drive, or all‑wheel drive). For Gen 3 hub assemblies, also check:
- Number of bolt holes on the flange
- ABS sensor type (active or passive)
- Whether the magnetic encoder ring is integrated
Quality Indicators – What Makes a Good Hub Assembly
Professional installers look beyond the brand name. Examine the following details if you can see the product before purchase:
- Seal design – Multi‑lip seals or metal shields keep water and dirt out. Poor sealing is the main cause of early bearing failure.
- Flange thickness – A thicker main flange resists bending under cornering loads.
- Rolled vs. ground raceways – Rolled (cold‑formed) raceways improve material grain flow and fatigue life compared to machined raceways.
- Magnetic encoder ring integration – A quality hub assembly embeds the ABS magnetic encoder ring deep enough to resist damage from brake dust or accidental tool contact during installation. Shallow designs are more prone to signal failure.
Single Bearing or Hub Assembly vs. Kit
Some suppliers offer just the bearing or the hub assembly alone. Others offer a kit that includes new bolts, nuts, and sometimes an ABS sensor. Kits can save time and ensure that stretch bolts (which should not be reused) are replaced. If your vehicle requires new axle nuts or flange bolts, buying a kit is often more convenient.
Quick Purchase Checklist
Use this list to ensure you select the correct part:
- Confirm your vehicle’s year, make, and model
- Identify if your vehicle uses a press‑in bearing or a bolt‑on hub assembly (check existing part)
- Note the number of bolt holes on the flange (usually 3, 4, or 5)
- Check whether you need an integrated ABS sensor (required for Gen 3)
- Inspect the seal design – multi‑lip is preferred
- Verify the flange thickness and bolt pattern
- Decide between a bare part or a kit with mounting hardware
- Choose between OE, premium aftermarket, or economy based on your budget and usage
Purchase Channels: OE, Brand‑Direct Aftermarket, and Used
| Channel | Quality | Price | Best for |
|---|---|---|---|
| Original Equipment (OE) | Identical to factory part, full warranty | Highest | Owners who want perfect matching and have a large budget |
| Brand‑direct / white‑label aftermarket (OEM‑equivalent) | ISO/TS‑certified, same specifications as OE without the brand markup | 30–50% lower than OE | Cost‑conscious buyers; repair shops; fleets; distributors |
| Reconditioned / used | Unknown remaining life, no warranty | Very low | Emergency temporary repair (not recommended for safety‑critical parts) |
DUHUI is a China‑based manufacturer that supplies Gen 1, Gen 2 and Gen 3 hub assemblies and wheel bearings directly to the aftermarket. DUHUI parts are built on IATF 16949 certified lines and feature multi‑lip seals, precision‑ground raceways, and properly embedded magnetic encoder rings. They provide an OE‑equivalent alternative at a competitive price, backed by a standard warranty. Other established international brands include SKF, Timken, NTN and NSK – but always compare the seal design, flange thickness, and magnetic encoder ring integration, as those details matter more than the logo.
Service Life and Maintenance
A wheel bearing or hub assembly typically lasts between 100,000 and 160,000 kilometres (approx. 60,000–100,000 miles). Many OE‑spec and premium aftermarket hub units can last even longer under normal driving conditions. However, severe factors – frequent pothole impacts, off‑road use, water immersion, overloading, or improper installation – can significantly shorten service life.
Maintenance notes: Modern hub assemblies are sealed and lubricated for life – you do not need to repack grease or adjust clearance. A quick check every 20,000 km (12,000 miles) – listening for noise while turning and inspecting for wheel play – is good practice.
Common Symptoms of a Failing Wheel Bearing or Hub Assembly
Recognising the signs of a bad wheel bearing early can prevent unsafe driving conditions and more expensive damage.
Noise Characteristics
A bad bearing usually produces a noise that changes with vehicle speed, not engine RPM. Common descriptions:
- Humming, rumbling or growling – most typical, often heard at 15–50 mph (25–80 km/h)
- Clicking or cracking – during sharp turns; indicates excessive internal clearance
- Grinding – advanced wear; metal‑to‑metal contact
Frequency note: Bearing noise changes linearly with wheel speed – as you accelerate, the pitch and frequency rise in direct proportion to vehicle speed. Tyre noise, in contrast, varies more randomly because tread blocks contact the road surface in an irregular pattern. This linear change is a key diagnostic clue.
Bearing noise vs. tyre noise – Perform the swerve test: drive straight at a moderate speed and gently turn the steering wheel left and right. If the noise gets louder when turning left, the right‑side bearings are loaded more heavily and are likely the source. If it gets louder turning right, suspect the left side. Tyre noise usually remains constant or changes slightly with road surface, not with steering angle.
Other Symptoms
- Steering wheel vibration (especially at low speeds)
- Vehicle pulls to one side when braking (loose bearing allows wheel movement)
- Uneven or scalloped tyre wear
- ABS warning light on (magnetic encoder ring damaged)
If you hear a loud grinding or the wheel has visible play, stop driving – the bearing may be close to seizing.
Replacement Cost Estimate (North American Reference)
Costs vary by vehicle, region, and labour rate. The following figures are typical for the North American aftermarket; prices elsewhere may differ.
- Economy hub assembly (aftermarket) : $50 – $140 per wheel
- Premium / OE‑grade hub assembly : $130 – $300+ per wheel (ranges may overlap)
- Labour (professional shop) : 1.0 – 2.5 hours at $80 – $150/hour
- Total (parts + labour) : $250 – $650 per wheel for most passenger cars
DIY replacement can save labour costs, but you will need a torque wrench, jack stands, and basic mechanical skills. Expect 1–3 hours per wheel.
Note: When replacing a front bearing or hub assembly, consider doing both sides at the same time. Conditions that caused one side to fail (age, mileage, road salt, water exposure) are likely to affect the opposite side as well.
Conclusion
Selecting the right wheel bearing or hub assembly starts with knowing your vehicle’s generation – press‑in bearing (Gen 1) vs. bolt‑on hub assembly (Gen 2/3). Use the quick purchase checklist, verify compatibility, and inspect seal design and flange thickness. Listen for speed‑related linear noise changes and perform the swerve test to confirm a failing bearing. A quality hub unit from a certified manufacturer – such as DUHUI – gives reliable service at a fair price, while proper installation with a torque wrench ensures correct preload and full performance. Follow this guide to make an informed purchase, and always prioritise safety over short‑term savings.
Frequently Asked Questions (FAQs)
Q1: What does a bad wheel bearing sound like?
A humming or rumbling that changes with road speed. The noise often gets louder when you turn the steering wheel towards the faulty side.
Q2: How can I tell which side is bad?
Drive straight at a moderate speed and gently swerve left and right. If the noise increases when turning left, the right‑side bearing is more likely worn; if it increases turning right, suspect the left side. Also listen for a linear change in pitch with vehicle speed.
Q3: Do I need a torque wrench to install a hub assembly?
Yes. Follow the vehicle manufacturer’s torque specification exactly. Do not use an impact gun for final tightening. See the installation note in the “Press‑In Bearing vs. Bolt‑On Hub Assembly” section above for details.
Q4: Should I replace only the faulty side or both?
For front bearings/hub assemblies, replacing in pairs is recommended. The remaining original bearing on the opposite side often fails soon after. For rear units, a single replacement is acceptable if the other side has low mileage and no symptoms.
Q5: Does a new hub assembly require a wheel alignment?
Not usually. Replacing a hub assembly does not change the camber, caster, or toe angles unless you also disconnect steering or suspension links. However, if the vehicle pulls or tyre wear appears after replacement, have the alignment checked.
Q6: Do hub assemblies need lubrication?
No. Modern sealed hub assemblies are pre‑greased and require no maintenance. Do not attempt to open the seal.
Q7: What warranty is typical for aftermarket hub assemblies?
Economy parts may have no warranty or only 30 days. Premium aftermarket and OE‑grade parts (including DUHUI) typically carry a 12‑ to 24‑month warranty against defects in materials and workmanship.


