Quick Answers – CV Joint Replacement
- When to replace a CV joint? Replace when you hear clicking on turns, feel vibration under acceleration, or see black grease inside the wheel.
- Can you drive with a bad CV joint? Not recommended. It can fail completely, leaving you stranded or causing steering issues.
- How much does it cost? $400–$1,400 per side for most cars. Boot‑only repair (if caught early) costs $400–$520.
- Can you replace just the boot? Yes, only if the joint is still quiet and clean. Once clicking starts, replace the whole halfshaft.
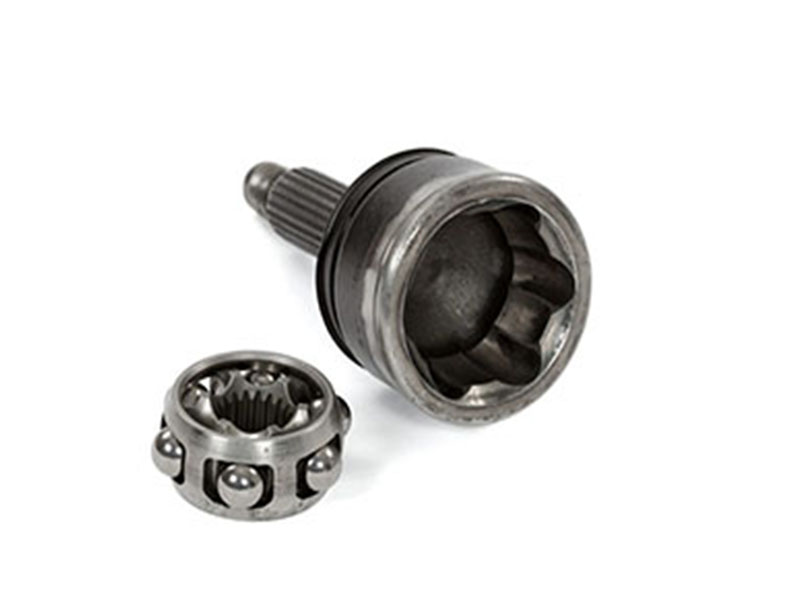
The constant velocity (CV) joint is a drivetrain component that transmits engine torque to the drive wheels while allowing steering movement and suspension travel. It is found on virtually all front‑wheel drive vehicles and many all‑wheel drive or four‑wheel drive models. A complete CV halfshaft assembly includes an inner joint (connected to the transaxle or differential), an outer joint (connected to the wheel hub), and the intermediate shaft. The inner joint accommodates length changes as the suspension moves; the outer joint maintains a constant rotational speed through steering angles.
In routine repair language, “replacing a CV joint” typically means replacing the entire halfshaft assembly. Replacing only the joint itself requires extensive disassembly and reassembly, which is rarely cost‑effective. This guide answers three central questions: when CV joint replacement becomes necessary, how to approach the repair, and how much it typically costs across different vehicle segments.
When: Recognizing the Need for CV Joint Replacement
Identifying the early signs of a failing CV joint prevents more extensive drivetrain damage and unexpected breakdowns. Symptoms follow a predictable pattern, becoming louder and more urgent as the joint deteriorates.
Common Symptoms of a Failing CV Joint
Clicking or popping during low‑speed turns
A rhythmic clicking or popping sound during tight, low‑speed turns – such as parking, exiting a driveway, or maneuvering in a garage – is the most common early indicator of outer CV joint wear. The noise occurs with each wheel rotation and intensifies when the steering wheel is held at or near full lock. This sound results from worn internal components (ball bearings and raceways) losing their correct contact geometry. A practical diagnostic clue: clicking while turning left often originates from the right‑side CV joint, and vice versa.
Clunking on acceleration or reverse engagement
A dull clunk or thud when accelerating from a stop or shifting into reverse typically points to inner CV joint wear. This symptom is load‑related rather than steering‑related and occurs the moment torque is applied to the drivetrain. Inner joints are designed to allow axial movement as the suspension compresses and extends. Excessive wear creates internal clearance, leading to abrupt torque engagement. This condition is generally more urgent than outer joint clicking, as it indicates advanced mechanical deterioration.
Shuddering or vibration under acceleration
If the vehicle shudders or vibrates noticeably during acceleration – especially from a standing start – the CV joint or halfshaft has likely become severely unbalanced. This is a late‑stage symptom. Unlike wheel imbalance (which correlates with vehicle speed), CV joint vibration is load‑dependent. It typically intensifies during hard acceleration or when climbing a grade, and often subsides when the accelerator is released.
Grease on the inner wheel or suspension components
A torn CV boot is the root cause of most CV joint failures. The boot keeps lubricating grease inside the joint and prevents contaminants (dirt, sand, moisture) from entering. When the boot tears, grease escapes and is flung onto the inner wheel rim, brake components, or suspension arms. If a torn boot is discovered early – before clicking or vibration begins – boot replacement may be sufficient. Once noise or vibration appears, the joint itself has already sustained damage that boot replacement cannot reverse.
Complete loss of power to the drive wheels
When a CV joint fails completely, torque can no longer be transmitted from the transmission to the wheel. The vehicle loses forward or reverse movement and requires towing. In rare cases, a seized CV joint can also cause steering difficulty or erratic handling, posing a safety risk.
Progression and Consequences of Delayed Repair
CV joint failure follows a predictable sequence: torn boot (contamination begins) → clicking on turns (outer joint wear) → clunking on acceleration (inner joint wear) → shuddering / vibration (severe imbalance) → complete failure (no power delivery). Each stage is more urgent than the previous one. A clicking sound does not mean immediate breakdown, but it is a clear repair signal that should not be ignored.
Delaying replacement has several consequences:
- Breakdown and towing: A failed joint stops the vehicle entirely, often in an inconvenient location.
- Secondary damage: Vibration from a failing halfshaft can accelerate wear on transmission seals, wheel bearings, and suspension components.
- Safety hazard: A seized joint may cause unpredictable steering behavior or sudden loss of control.
- Accelerated deterioration: Once the boot tears, contaminants enter the joint rapidly, and wear progresses exponentially with every mile driven.
When Boot Replacement Alone Is Sufficient
If a torn or cracked boot is discovered during routine maintenance – and there are no clicking, clunking, or vibration symptoms – replacing only the boot can be a viable option. A new boot and fresh grease restore sealing at a relatively low cost (typically $50–$200 for parts). However, once clicking or vibration begins, boot replacement alone will not repair the joint. Internal wear is irreversible, and the only effective solution is replacing the halfshaft.
Preventive Maintenance
Inspect CV boots during every oil change or routine service. Look for cracks, tears, or signs of grease leakage. Replacing a boot at the first sign of damage prevents contamination from reaching the joint. Additionally, avoid holding the steering wheel at full lock for extended periods, as this places the outer CV joint under maximum operating angle and accelerates wear.
How: Repair Options and DIY Replacement Guide
When CV joint issues are confirmed, vehicle owners and technicians typically consider three repair paths. The choice depends on the severity of damage, vehicle age, mileage, and budget.
Repair Options Overview
Option 1: CV Boot Replacement Only
Best for torn boots discovered before any noise or vibration appears. Parts cost is typically $50–$200 (boot kit, grease, clamps). Labor time is 2–4 hours because the axle must be removed and disassembled. This option preserves the original CV joint but is only effective if the joint is still clean and undamaged. Once contamination has entered, boot replacement alone will not restore normal function.
Option 2: Individual CV Joint Replacement
This applies to limited scenarios where the halfshaft is otherwise in good condition but one joint has failed, and replacement joints are available separately. Parts cost is lower than a complete halfshaft (joint only), but labor is higher because disassembly, cleaning, and reassembly take additional time. After factoring labor, total cost often approaches or exceeds that of a complete halfshaft assembly. Most professional technicians no longer offer this option.
Option 3: Complete Halfshaft Assembly Replacement
This is suitable for most cases involving confirmed CV joint wear, high‑mileage vehicles, or when maximum long‑term reliability is desired. Parts cost ranges from $60–$400+ depending on brand, vehicle, and quality tier. Labor is lower (1–2 hours) because the assembly installs without disassembly. All components (both joints, boots, and pre‑packed grease) are new. This has become the industry standard for most repairs.
Comparison: Boot Replacement vs. Halfshaft Assembly
| Aspect | Boot Replacement Only | Complete Halfshaft Assembly |
|---|---|---|
| Suitable when | Boot torn, joint intact | Joint worn or high mileage |
| Parts cost | $50–$200 | $60–$400+ |
| Labor time | 2–4 hours | 1–2 hours |
| Long‑term reliability | Depends on original joint condition | New components throughout |
| Typical recommendation | Low‑mileage vehicle, early discovery | Most standard repairs |
DIY CV Joint Replacement Guide
The following steps describe replacing a complete halfshaft assembly. Boot‑only replacement requires a different procedure and is not covered here.
Replacing a CV halfshaft is considered a moderate‑difficulty task. It requires experience with brake and suspension work, basic mechanical knowledge, and the ability to follow torque specifications. If you have previously replaced brake components or suspension parts, you may be able to perform this repair.
Required tools and materials:
- Replacement CV halfshaft assembly (verify fitment by year, make, model, and engine)
- Socket set including an axle nut socket (size varies by vehicle)
- Breaker bar (for loosening the axle nut)
- Ball joint separator (pickle fork or press‑type tool)
- C‑clamp or snap ring pliers
- Hammer, wood block, dead blow mallet
- Floor jack and jack stands
- Penetrating oil (e.g., WD‑40), rags, gloves, grease (for sealing or incidental needs)
Summary of removal and installation steps:
- Preparation: Loosen the axle nut while the vehicle is on the ground and the wheel is still mounted. Do not fully remove it at this stage.
- Lift and secure: Raise the vehicle and support it on jack stands. Remove the front wheel.
- Brake disassembly: Remove the brake caliper and support it with a wire or strap to avoid stressing the brake hose. Remove the brake rotor.
- Suspension separation: Use a ball joint separator to detach the steering knuckle from the lower control arm. Some vehicles also require separating the tie rod end.
- Remove the old halfshaft: Pull the outer end from the wheel hub. Use a wood block and hammer to tap the inner end out of the transaxle or differential; the snap ring will release with a sharp impact.
- Install the new halfshaft: Insert the inner end into the transaxle until the snap ring engages (an audible click or a firm stop). Align the outer end with the wheel hub and push it through.
- Reassembly: Reinstall suspension components, brake rotor, and caliper. Tighten all fasteners to manufacturer torque specifications.
- Final torque: Install the wheel, lower the vehicle to the ground, and torque the axle nut to the specified value with the vehicle’s weight on the wheels.
Important precautions:
- Always refer to the vehicle‑specific service manual. Procedures vary significantly between makes and models.
- Before installation, compare the new halfshaft to the old one. Verify spline count, overall length, and any mounting flange or ABS ring configuration.
- Take reference photos during disassembly to assist reassembly.
- Cover the transaxle opening with a clean rag to prevent debris entry while the old halfshaft is removed.
- After replacement, perform a road test at varying speeds and steering angles. Listen for abnormal noise and feel for vibration.
How Much: CV Joint Replacement Cost Reference
Costs vary significantly based on vehicle make and model, part quality, labor rates, and geographic region. The figures below reflect typical North American market pricing and are broken down by labor and parts components.
Complete Halfshaft Replacement Cost Breakdown
Labor Cost (professional installation):
- Independent repair shop: $80–$120 per hour
- Dealership: $150–$200 per hour
- Typical labor time: 1.5–3 hours per side
- Total labor cost range: $120–$600 per side
Parts Cost (replacement halfshaft assembly):
- Economy aftermarket: $60–$150 per side
- Branded aftermarket (e.g., NAPA, Duralast): $150–$300 per side
- Original equipment (OEM): $300–$1,000+ per side
Total estimated cost (parts + labor):
- Typical mainstream passenger car: $400–$1,400 per side
- Luxury or heavy‑duty vehicle: $1,200–$1,800+ per side
- Boot‑only replacement (including labor, joint intact): $400–$520 per side
- DIY replacement (parts only): $60–$150 per halfshaft
Factors That Influence Total Cost
- Part quality tier: Aftermarket (lowest) → Branded aftermarket (mid) → Original equipment (OEM, highest).
- Vehicle make and model: European luxury vehicles and heavy‑duty trucks command higher parts prices and often require more labor due to tighter engine bay layouts or additional component removal.
- Repair facility type: Dealership labor rates are typically higher than independent shops.
- Additional related repairs: If the wheel bearing, tie rod end, ball joint, or brake components also require replacement during the same service, total cost increases accordingly.
Conclusion
CV joint replacement is guided by symptoms that progress from a torn boot (visual grease leakage) to clicking on turns, clunking on acceleration, vibration under load, and finally complete power loss. Timely intervention at the boot stage is the least expensive. Once internal wear produces noise, replacing the entire halfshaft assembly is the most reliable and cost‑effective repair for most vehicles. Costs vary widely by vehicle model, part quality, and labor rates, but typical passenger car replacements range from $400–$1,400 per side. Regular boot inspection and prompt maintenance remain the best practices for maximizing CV joint service life.
Frequently Asked Questions (FAQs)
Q: How long does a CV joint typically last?
A: There is no fixed replacement interval. Under normal operating conditions with intact boots and proper lubrication, a CV joint can exceed 150,000 miles. Many original equipment CV joints last the lifetime of the vehicle if the boots remain undamaged. Once a boot tears, joint life reduces dramatically – often to only a few thousand miles, depending on driving conditions and contamination levels.
Q: Is it safe to drive with a failing CV joint?
A: Driving with a worn CV joint is not recommended. The condition progresses from mild clicking to complete failure. In the worst case, a seized joint may cause sudden steering difficulty or loss of control. Immediate repair upon hearing persistent clicking or clunking helps avoid towing and more expensive secondary damage.
Q: Is a wheel alignment necessary after CV joint replacement?
A: In most cases, yes. Replacing a halfshaft typically requires disconnecting suspension components such as the lower control arm or steering knuckle. This can alter toe, camber, and caster angles. A post‑repair alignment (typically $80–$120) protects tire life, ensures straight‑line stability, and restores proper handling. If only the axle nut and wheel hub are disturbed and no suspension bolts were loosened, alignment may not be required, but this is the exception rather than the rule.
Q: How can CV joint life be extended?
A: The most effective method is inspecting CV boots regularly (at each oil change) and replacing them at the first sign of cracking, tearing, or grease leakage. Additionally, avoid driving over debris that could puncture boots, and minimize time spent at full steering lock, which maximizes the outer joint’s operating angle and accelerates wear.
Q: What are typical CV joint replacement costs in China?
A: For mainstream domestic or joint‑venture sedans (e.g., Geely, BYD, Volkswagen Lavida), parts cost approximately ¥150–¥600 per halfshaft, with labor at ¥200–¥500, totaling ¥500–¥1,500 per side. For Japanese or European brands using OEM parts, dealer replacements typically range from ¥1,500–¥4,000. Purchasing parts from online platforms (e.g., Taobao, JD.com) and having them installed at an independent workshop can reduce total cost by 30–50% compared to dealership pricing.


