Quick Answer: Replace a hydraulic throwout bearing when you hear grinding on pedal press, feel a soft pedal, or see fluid leaking from the bellhousing. Steps: remove transmission, drain fluid, unbolt old bearing, clean and grease the sliding surface, install new bearing, set air gap to 0.150–0.200 inches, reinstall transmission, refill with DOT 3 fluid, and bleed thoroughly.
Your clutch pedal feels spongy. There’s a grinding noise every time you push it down. Or maybe you’ve noticed fluid spots on your garage floor near the transmission. These are all signs that your hydraulic throwout bearing may be failing.
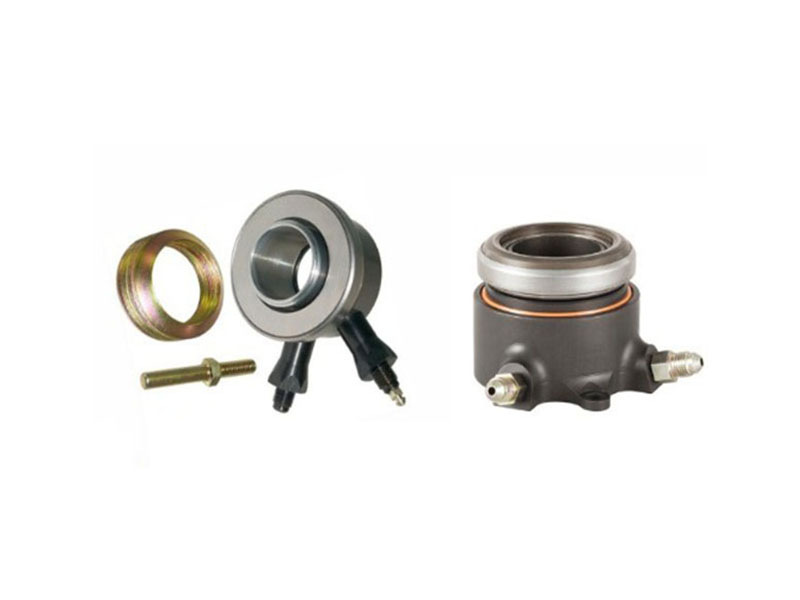
The hydraulic throwout bearing—also called a concentric slave cylinder (CSC)—is a combined bearing and hydraulic actuator mounted around the transmission input shaft inside the bellhousing. Unlike traditional mechanical release bearings operated by a clutch fork, hydraulic units are self-contained assemblies. When they fail, the transmission must come out for replacement.
This guide walks through the complete replacement process, from identifying a failing bearing to bleeding the system afterward. Whether you’re a DIY mechanic or a shop technician, you’ll find the steps, specifications, and troubleshooting advice you need to get the job done right.
How to Recognize a Failing Hydraulic Throwout Bearing
Before pulling the transmission out, you need to be sure the throwout bearing is actually the problem. A failing hydraulic throwout bearing produces clear, repeatable symptoms.
Noise when pressing the clutch pedal. This is the most common sign. A grinding, whining, chirping, or rattling noise appears only when the clutch pedal is depressed and disappears when you release it. The noise comes from worn rollers, damaged races, or loss of internal lubrication.
Soft or sinking pedal feel. If the pedal feels spongy or slowly sinks toward the floor under sustained pressure, the internal seals are likely leaking. A soft pedal that won’t build pressure often points to a CSC that’s lost its hydraulic seal.
Difficulty shifting gears. When the bearing can’t fully disengage the clutch, you’ll struggle to get into gear—especially first gear and reverse. You might hear gear grinding as you try to shift.
Visible fluid loss without external leaks. Because the CSC is inside the bellhousing, fluid leaking from it drips out through the transmission’s vent or weep hole, not from an external fitting. If your clutch fluid level keeps dropping and you can’t find an external leak, suspect an internal bearing failure.
Clutch shudder or contamination. Leaking hydraulic fluid can contaminate the clutch disc, causing chatter or shudder when engaging the clutch from a stop.
If you’re replacing the clutch disc and pressure plate anyway, replacing the hydraulic throwout bearing at the same time is industry best practice. The labor to access it is identical—doing it now prevents having to pull the transmission again later.
Tools and Parts You’ll Need
Gather everything before you start. Nothing’s worse than having the transmission halfway out and realizing you’re missing a tool.
Tools:
- Socket wrench set with extensions
- Torque wrench (for precise bolt tightening)
- Needle-nose pliers (for hydraulic line retaining clips)
- Brake cleaner or carburetor cleaner
- Shop rags
- Drain pan
- Safety glasses and gloves
Parts and consumables:
- Replacement hydraulic throwout bearing assembly
- Fresh DOT 3 brake fluid (non-silicone type)
- Permeation oil for stuck bolts
- Small amount of high-temperature grease for the sliding surface
Removing the Old Hydraulic Throwout Bearing
The transmission must come out first. This guide assumes the transmission is already removed and sitting on a bench or jack.
Step 1: Drain the clutch hydraulic system. Open the clutch master cylinder reservoir under the hood and use a suction tool to empty the fluid. This prevents spills when you disconnect the hydraulic line.
Step 2: Remove the hydraulic line retainer clip. Use needle-nose pliers to remove the retaining clip that secures the hydraulic line to the bellhousing or bracket. This frees the metal fluid line from the transmission housing.
Step 3: Remove the mounting bolts. Most hydraulic throwout bearing assemblies are held in place by three or four mounting bolts. These are typically Torx or standard hex heads. Remove them and set them aside.
Step 4: Disconnect the hydraulic line fitting. If your bearing uses a quick-connect style fitting, use a small flathead screwdriver to press the white retaining ring inward while pulling the line out. For threaded fittings, simply unscrew them.
Step 5: Pull the old bearing assembly. Grasp the bearing firmly and pull it outward off the input shaft bearing retainer. If the bearing has completely failed, it may come out in pieces. Remove every fragment and piece before cleaning the surface.
Step 6: Match the old and new bearings. Place the new bearing next to the old one. Check that the inner diameter, outer diameter, and overall height match exactly. If the new bearing is thinner, the clutch pedal will have excessive play and may not fully release. If it’s thicker, the clutch may not fully engage.
Installing the New Hydraulic Throwout Bearing
With the old bearing removed and the sliding surface cleaned, you’re ready to install the new unit.
Clean the sliding surface thoroughly. Use brake cleaner or carburetor cleaner to remove all old grease, dirt, and debris from the input shaft bearing retainer. Any contamination left behind can cause premature wear or binding.
Apply grease to the sliding surface. Once the surface is completely clean, apply a small amount of high-temperature grease. Do not install a throwout bearing dry—it will cause the bearing to seize, make the clutch pedal extremely hard to push, and ruin the clutch operation.
Pre-lubricate the hydraulic piston. Manually extend the bearing piston to its fully extended position, apply a few drops of DOT 3 brake fluid to the piston shaft, then cycle it back and forth several times until movement feels smooth. This protects the internal seals and ensures smooth operation.
Install the anti-rotation stud. On most hydraulic throwout bearings, you’ll need to replace a bolt in the 2 o’clock position on the transmission bearing retainer with the supplied anti-rotation stud. This stud fits between the two hydraulic ports on the bearing and prevents the assembly from rotating during use.
Slide the new bearing into place. Push the bearing onto the input shaft bearing retainer, ensuring the anti-rotation stud sits squarely between the two hydraulic fittings.
Hand-thread the mounting bolts. Always start the bolts by hand to avoid cross-threading. Once they’re started, use a socket to tighten them evenly to the manufacturer’s torque specification—check your bearing’s instructions; typical values range from 7 to 12 foot-pounds.
Spin the bearing by hand. After the bolts are torqued, rotate the bearing manually. It should turn smoothly with no roughness, binding, or irregular noises.
Setting the Correct Air Gap
Proper air gap between the bearing face and the clutch diaphragm fingers is critical. Too much gap means the clutch won’t fully disengage. Too little gap can cause the bearing to over-travel and collide with the retaining ring or make constant contact with the fingers.
Industry data from multiple manufacturers provides clear guidance. RAM Clutches recommends a gap of 0.150 inches for single-disc clutches and approximately 0.200 inches for dual-disc setups. The extra 0.050 inch for dual-disc clutches prevents the fingers from hitting the bearing as the friction material wears. McLeod recommends a range of 0.100 to 0.300 inches.
Measuring the air gap requires two measurements:
- Measurement A: With the clutch and bellhousing installed on the engine, measure from the bellhousing mounting face (where the transmission bolts up) to the top of the clutch diaphragm fingers.
- Measurement B: With the hydraulic throwout bearing installed on the transmission and the piston fully retracted, measure from the transmission mounting face to the bearing face.
The air gap is B minus A. Shim the bearing outward if the gap exceeds the manufacturer’s recommended range. If the gap is too small, you’ll need to modify the bearing position or machine the bearing retainer.
If your bearing kit includes a dedicated setup tool, use it. The tool eliminates the math and removes the guesswork from this critical adjustment step.
Reinstalling the Transmission and Connecting Lines
Once the air gap is set correctly and the bearing is torqued in place, the transmission can be reinstalled.
Carefully guide the transmission input shaft through the clutch disc and into the pilot bearing while keeping the hydraulic lines clear. Seat the transmission fully against the bellhousing and install all bellhousing bolts. Torque them to factory specifications.
Connect the hydraulic line from the master cylinder to the bearing’s inlet port. If your bearing has two ports, the port at the top position must connect to the bleed line. Route the bleed line outside the bellhousing through the clutch fork opening for easy access. The bleed fitting should be positioned at the top when the bearing is properly installed to allow air to escape during bleeding.
Make sure both lines stay clear of the exhaust system and any moving parts like the clutch and flywheel.
Refilling and Bleeding the System
Bleeding a hydraulic throwout bearing is the most critical step after installation. An improperly bled bearing will cause a weird pedal feel or prevent the clutch from engaging and disengaging properly.
Fill the master cylinder. Use only DOT 3 or DOT 4 non-silicone brake fluid. Do NOT use silicone-based DOT 5 fluid. (DOT 5.1 non-silicone fluid is acceptable if specified by your bearing manufacturer—always check the manual.)
Standard bleeding method:
- Open the bearing’s bleed screw until it’s held by only one or two threads—nearly falling out
- Place the bleed line into a clear container partially filled with clean brake fluid
- Slowly depress the clutch pedal fully and hold it for 2–3 seconds
- Close the bleed screw while the pedal is still depressed
- Release the pedal slowly and wait 2–3 seconds
- Repeat this cycle until fluid coming out of the bleed line is completely free of bubbles
Always keep the master cylinder reservoir topped off during bleeding. Running the reservoir dry pulls air back into the system and forces you to start over.
Self-bleeding systems: Some hydraulic throwout bearing designs have no bleed screw. In these systems, air bubbles naturally rise up through the hydraulic line into the master cylinder reservoir. Pump the clutch pedal repeatedly while keeping the reservoir full until normal pedal feel returns.
Final fluid level check: Once bleeding is complete, refill the master cylinder to about halfway between the minimum and maximum marks. The fluid level will rise as the clutch wears—unlike brake systems where fluid level drops—so leave about 1/2 to 3/4 inch of space from the top for expansion.
Testing After Replacement
After the transmission is reinstalled, the lines are connected, and the system is bled, test the clutch operation thoroughly before driving.
Press the clutch pedal several times and feel for consistency. The pedal should feel firm, similar to the brake pedal, with a clear engagement point at roughly the same position each time. If the pedal feels soft or the engagement point moves around, air is still trapped in the system—bleed it again.
With the engine running, shift through all gears at a standstill. Each gear should engage smoothly with no grinding. If first gear or reverse resists engagement, the clutch isn’t fully disengaging—check the air gap adjustment or try bleeding the system again.
Drive the vehicle in a safe area and test clutch engagement and disengagement under normal driving conditions. The clutch should engage smoothly with no shudder, and shifting should be clean across all gears.
Common Troubleshooting Issues
| Issue | Probable Cause |
|---|---|
| Clutch won’t fully disengage (hard to shift) | Air gap too large; bearing not traveling far enough |
| Clutch won’t fully engage (slipping) | Air gap too small; bearing pre-loading the fingers |
| Pedal feels spongy or goes to floor | Air still in the hydraulic system; incomplete bleeding |
| Fluid leaking from bellhousing vent | Internal seal failure in the bearing |
| Clutch engagement point wanders | Master cylinder pushrod pre-loading the piston; adjust pedal rod |
| Bearing makes noise when pedal is pressed | Defective bearing or improper lubrication |
One of the most overlooked issues involves the master cylinder pushrod adjustment. If the pushrod pre-loads the piston when the pedal is in the home position, the piston sits too far forward. This blocks the transfer port inside the master cylinder, starving it of fluid and making bleeding nearly impossible. Adjust the pushrod so the piston fully retracts against the snap ring with no pre-load.
Conclusion
Replacing a hydraulic throwout bearing is a substantial job—the transmission has to come out, the old unit must be removed carefully, and the new bearing needs precise gap adjustment and thorough bleeding. But the job is entirely doable with the right tools, patience, and attention to detail.
Here are the key takeaways:
Replace proactively when the clutch is serviced. The labor to access a hydraulic throwout bearing is the same as replacing the clutch itself. Do both at the same time to avoid paying for duplicate transmission removal later.
Never install a hydraulic throwout bearing dry. Clean the sliding surface thoroughly and apply grease. Pre-lubricate the hydraulic piston with DOT 3 fluid before installation.
Measure the air gap precisely every time. Use calipers and follow the measurement procedure. For single-disc clutches, target 0.150 inches; for dual-disc setups, target 0.200 inches.
Use only DOT 3 or DOT 4 non-silicone brake fluid. DOT 5 silicone fluid destroys the internal seals. If your bearing allows DOT 5.1, confirm it in the documentation.
Bleed the system completely. Take your time. A rushed bleed leaves air in the system, which makes the pedal feel wrong and can damage the bearing over time.
If you’re sourcing replacement hydraulic throwout bearings for your workshop or distribution network, DUHUI manufactures automotive bearings with over two decades of industry experience, supplying thousands of SKUs for the global aftermarket. For technical specifications or application inquiries, visit www.dhautoparts.com to learn more.
FAQs
Q: Should I replace the hydraulic throwout bearing when replacing the clutch?
A: Yes. Industry practice recommends replacing the CSC/release bearing assembly whenever the clutch is replaced. The transmission has to come out for both jobs, so doing them together is inexpensive insurance against doing the same labor twice.
Q: How do I distinguish throwout bearing noise from other clutch noises?
A: If the noise occurs only when the clutch pedal is depressed and disappears when you release it, the problem is almost certainly the throwout bearing. Noise that changes with engine RPM but not with pedal position typically points to input shaft bearings.
Q: What’s the difference between a hydraulic throwout bearing and a standard release bearing?
A: A hydraulic throwout bearing combines the bearing and hydraulic actuator into one unit mounted concentrically around the transmission input shaft. A standard mechanical release bearing is operated by a clutch fork and external slave cylinder. Hydraulic units save space and offer smoother operation, but they require precise gap setting and can’t be serviced without removing the transmission.
Q: How long does a hydraulic throwout bearing typically last?
A: Service life varies significantly based on driving habits, but most hydraulic throwout bearings last 60,000 to 100,000 miles. Resting your foot on the clutch pedal while driving accelerates wear significantly.
Q: What brake fluid should I use for a hydraulic throwout bearing?
A: Use only DOT 3 or DOT 4 non-silicone brake fluid. Never use silicone-based DOT 5 fluid—it damages the seals and causes internal leaks. DOT 5.1 (non-silicone) may be acceptable; always check the bearing manufacturer’s specific fluid recommendations.
Q: The clutch pedal feels fine but the clutch won’t disengage. What’s wrong?
A: This is almost always an air gap issue. Too much clearance between the bearing face and the clutch fingers prevents the bearing from traveling far enough to release the clutch. Check the air gap and add shims as needed. RAM and other manufacturers provide specific shim packs in their bearing kits for exactly this adjustment.
Q: Can a hydraulic throwout bearing fail without leaking externally?
A: Yes. The bearing can develop internal seal damage that allows fluid to bypass without visible external leakage. The first signs are usually a soft pedal and difficulty shifting, not necessarily visible fluid loss.


