A failing center support bearing (commonly called carrier bearing or hanger bearing) produces characteristic sounds and vibrations that signal driveline trouble. Recognizing these symptoms early, understanding why the bearing fails, and following correct replacement procedures can prevent damage to the transmission, differential, or driveshaft. This guide covers the complete process from symptom recognition to verified repair.
What Is a Driveshaft Carrier Bearing and How Does It Work?
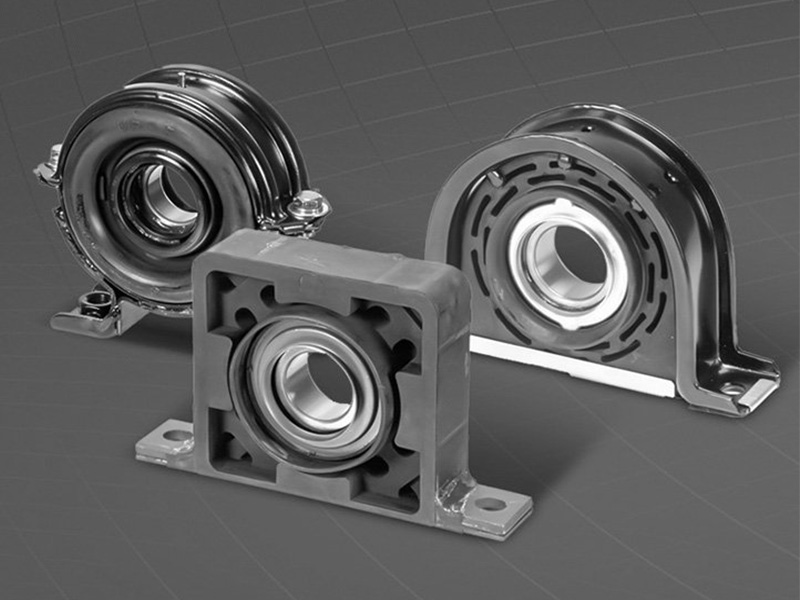
Which vehicles use a carrier bearing? Vehicles with a long wheelbase – typically rear‑wheel drive trucks, vans, SUVs, and some all‑wheel drive models – often have a two‑piece or three‑piece driveshaft. In these designs, the driveshaft is split into multiple sections connected by universal joints (U‑joints). The carrier bearing (also referred to as center support bearing, hanger bearing, or simply center bearing) is bolted to a frame crossmember and supports the intermediate section of the driveshaft. Its primary job is to minimize bending and vibration during rotation.
Construction – The component consists of a sealed ball bearing pressed into a rubber cushion or isolator. The rubber allows limited vertical movement of the driveshaft while absorbing driveline vibrations before they reach the chassis. Over time, the rubber hardens or cracks, and the bearing loses its internal grease – leading to noise, vibration, and eventually mechanical failure.
Why early attention matters – Unusual noise is the earliest warning. Ignoring it allows a chain reaction that can damage the transmission output shaft, differential input shaft, or the driveshaft itself. This article explains how to recognize the problem, confirm it through basic checks, understand the root causes, and carry out a proper replacement.
How to Tell If the Center Support Bearing Is Failing
Audible Clues: Types of Sounds and What They Mean
- Low‑pitched hum or drone at specific speeds – A constant humming that appears most clearly between 40 and 70 mph (65–110 km/h). The noise becomes louder when you press the accelerator and may fade slightly when you coast. This usually indicates the bearing has lost its internal lubrication.
- High‑pitched squeal under acceleration – When the bearing grease is completely gone, metal balls grind against the raceway. The result is a squeal that rises in pitch as engine speed increases.
- Clunk or rattle during take‑off or gear changes – Caused by excessive movement of the driveshaft due to a loose support bearing. The sound is most noticeable the moment torque changes, for example when shifting from Park to Drive or when accelerating from a stop.
- Grinding or deep thumping in advanced failure – After the rubber cushion tears or the bearing disintegrates, metal parts collide. A grinding noise accompanied by strong, rhythmic thumping indicates the bearing is close to total failure.
Symptoms usually follow a predictable progression: a faint vibration first, then speed‑specific humming, followed by clunking on shifts, and finally grinding in severe stages.
Vibrations You Can Feel
- Floor pan vibration under acceleration – As the rubber hardens, it no longer isolates vibration. You will feel a buzz or shake through the floor, typically under the center console or front seats. This is different from steering wheel vibration caused by unbalanced tires.
- Shudder or “judder” at low‑speed pull‑away – The shudder disappears as soon as you release the accelerator pedal – a strong indicator that the carrier bearing is the source.
Visual and Other Observable Signs
- Loose driveline feel – The vehicle seems “slack”; there is a delayed response when you step on or off the throttle.
- Visible damage when lifted – With the vehicle safely supported, look for cracked, hardened, or oil‑soaked rubber around the bearing. Also check for rust, grease leakage, or obvious sideways movement of the bearing bracket.
- Steering instability at highway speeds – In extreme cases, a severely worn bearing allows the driveshaft to whip, causing body sway or steering difficulty.
- Higher fuel consumption – Reduced driveline efficiency forces the engine to work harder, increasing fuel use.
How to Diagnose a Failing Center Support Bearing
Safety First and Preliminary Checks
Park on level ground, set the parking brake, and chock the wheels. Raise the vehicle and support it securely on jack stands – never rely on a jack alone. Wear safety glasses, gloves, and a dust mask. Before focusing on the driveshaft, rule out worn engine or transmission mounts, which can produce similar vibration.
Listening and Looking
Test drive – Drive on a safe road and note how noise changes under acceleration, steady speed, coasting, and gear shifts. If the sound continues while coasting, the problem is almost certainly in the driveline (carrier bearing or U‑joints) rather than the engine.
Visual inspection – Under the vehicle, examine the rubber cushion for cracks, hardening, or oil contamination. Check the bearing bracket bolts for tightness. Look for scrape marks on the driveshaft tube – that indicates the shaft has sagged and touched the frame.
Hands‑On Checks
Wiggle test – Grab the driveshaft near the carrier bearing and push it up‑down and side‑to‑side. Any noticeable clunk or excessive movement confirms a worn support bearing.
Rotation test – Rotate the driveshaft by hand. A smooth rotation with no grinding or binding is normal. If you feel roughness or hear a “gritty” sound, the bearing is failing. You can use a mechanic’s stethoscope or a long screwdriver (handle to your ear, tip on the bearing housing) to listen for internal scraping.
Differentiating between a bad U‑joint and a bad carrier bearing – Rotate the driveshaft and watch the joint. If the shaft turns several degrees before the other section moves, the U‑joint has excessive rotational play. If the shaft wobbles side‑to‑side or up‑down while you hold it still, the carrier bearing is loose. (Adapted from common shop practice; not a quote from any single source.)
Professional‑Level Diagnostic Aids
- Driveline angle measurement – Using a magnetic or digital angle finder, measure the angles at the transmission output, driveshaft, and differential input. Angles outside manufacturer specifications put extra side load on the carrier bearing. This is especially important for vehicles with suspension lifts.
- Vibration frequency analysis – Some shops use a three‑axis accelerometer. First‑order vibration (once per driveshaft revolution) usually indicates imbalance; second‑order vibration often points to an angle problem.
Common Causes of Carrier Bearing Failure
Gradual Wear from Normal Use
Over time, the sealed ball bearing loses its original grease. Without lubrication, metal‑to‑metal contact generates heat and noise. Most factory carrier bearings are permanently sealed and cannot be re‑greased. Simultaneously, the rubber isolator hardens and cracks due to heat cycling, ozone, and exposure to road oils – a natural aging process.
Driveshaft Misalignment
If the bearing is not installed perfectly perpendicular to the driveshaft axis, uneven loading accelerates wear. This can happen after a previous repair if alignment marks were ignored or torque was uneven. In severe cases, the rubber isolator may even slide off its seat, causing metal‑on‑metal contact. Suspension modifications (lifting or lowering) also change the driveshaft operating angle, putting extra stress on the carrier bearing.
Harsh Environment and Contamination
Road salt, water, and mud can enter the bearing if the protective dust shield is missing or damaged, leading to rust. Oil leaks from the transmission or transfer case drip onto the rubber cushion, causing it to swell and soften, losing its structural integrity.
Damage Spread from Other Components
- Worn U‑joints – A binding or loose U‑joint creates vibration that is directly transmitted to the carrier bearing, quickly destroying the rubber and the bearing itself. Replacing the carrier bearing without fixing a bad U‑joint is a waste of money.
- Bent or out‑of‑balance driveshaft – A bent shaft or a missing balance weight produces a centrifugal force that will ruin any carrier bearing in a short time.
Prevention in Brief
- Include the driveshaft and bearing in routine underbody inspections.
- When you replace U‑joints, inspect the carrier bearing at the same time and replace both if needed.
- After any suspension lift or drop, verify and correct the driveline angles.
How to Replace a Driveshaft Carrier Bearing
Complete Replacement Is the Only Reliable Solution
Patching or trying to inject grease into a sealed bearing is ineffective. Rubber degradation and bearing wear are irreversible. A new bearing is required. On many vehicles, the carrier bearing is sold separately (roughly $50–120 in the U.S. market). However, some manufacturers do not offer a separate bearing; you must buy the entire driveshaft assembly, which significantly increases cost. Dealerships typically recommend the full assembly, while independent driveline shops can often replace just the bearing.
Critical Steps for a Successful Replacement
- Make permanent alignment marks – Before removing anything, mark the relationship between the driveshaft flanges and the companion flanges on the transmission and differential. Use a cold chisel or an engraver to make marks that cannot be wiped away. Crayon or paint can rub off during handling. Reassembly must follow these marks exactly; otherwise, the driveshaft will be out of balance and cause severe vibration.
- Use the right tools – Removing the old bearing and pressing on the new one requires a hydraulic press and a bearing puller. Most home mechanics do not have these tools.
- Clean and measure – Thoroughly clean the bearing seat on the driveshaft. Measure the journal diameter – different engine/transmission combinations for the same vehicle model may use different bearing sizes. Ordering by year/make/model alone is risky; always confirm physical dimensions or the OEM part number.
- Follow torque specifications – Tighten the bearing bracket bolts and the driveshaft flange bolts to the values given in the vehicle’s service manual. Use a torque wrench and apply even torque on both sides.
- Lubricate U‑joints and inspect them – If the U‑joints have grease fittings, lubricate them. If they show any wear or binding, replace them at the same time as the carrier bearing – otherwise the new bearing will fail prematurely.
Post‑Replacement Verification
After installation, do the following to confirm the repair:
- Test drive – Drive through the full speed range, especially the speeds where noise was previously heard. Vibration and noise should be completely gone.
- Re‑inspect visually – Lift the vehicle again and check the new bearing’s position, the rubber condition, and that the alignment marks still match.
- Re‑torque after break‑in – After 50–100 miles (80–160 km), re‑check the torque on the bearing bracket bolts.
Choosing a Quality Replacement Part
- Prefer an OEM‑quality bearing or a well‑known aftermarket brand (e.g., Spicer). The quality directly determines how long the repair will last.
- Very cheap bearings often fail within months, costing more in repeat labor.
- Always verify the bearing size matches your specific shaft before installation.
Professional Repair vs. DIY
- Professional repair is strongly recommended – The job requires precision alignment, specialized tools, and experience. Mistakes can create worse problems than the original.
- DIY feasibility – Experienced home mechanics with a press and a full set of tools may attempt it. However, rusted bearings and bolts can be extremely difficult to remove. Also, some vehicles do not offer a separate bearing – the whole driveshaft must be replaced. Unless you have done similar work before, leave it to a professional.
Cost Reference (U.S. Market, 2026)
- Average total cost: $374–$507 (parts $182–227, labor $191–280). (Source: RepairPal data, used for reference)
- An independent shop may quote around $570 including diagnosis.
- In other regions, a standalone bearing can cost as little as $8–25, while a dealer‑replaced driveshaft assembly may exceed $400.
Summary and Recommendations
- Driveshaft carrier bearing noise is not a minor annoyance – it is a clear warning of progressive driveline damage.
- Follow the three‑step rule: timely identification (noise patterns + vibration behavior), correct diagnosis (wiggle test + rotation check), and proper replacement (torque to spec + alignment marks).
- Delaying repair can lead to driveshaft detachment or destruction of the transmission and differential – repair costs multiply quickly.
- For repair shops and DIY users: Always inspect U‑joints before replacing the carrier bearing. Replace them together if worn. After installation, confirm proper alignment. Do not treat the symptom alone.
Frequently Asked Questions (FAQs)
Q1: How can I tell the difference between carrier bearing noise and U‑joint noise?
A worn U‑joint produces a sharp “clunk” when torque changes (take‑off or gear shifts). A failing carrier bearing produces a continuous hum or roar that increases with speed and persists during coasting. To confirm, raise the vehicle and rotate the driveshaft by hand. Rotational play (the shaft turns several degrees before the other section moves) indicates a bad U‑joint. Vertical or side‑to‑side wobble indicates a loose carrier bearing.
Q2: Is it safe to drive with a bad carrier bearing?
No. In early stages you may be able to drive, but continued use accelerates wear. Eventually the bearing can disintegrate, causing the driveshaft to lose support, whip violently, and strike the frame or ground – a serious safety hazard. Sustained vibration also damages the transmission output shaft and differential. Schedule repair as soon as possible.
Q3: Does replacing a carrier bearing require driveshaft balancing?
Replacing only the bearing does not require full driveshaft balancing if you follow the alignment mark procedure. However, if the driveshaft was vibrating badly enough to cause the original bearing to fail, it may already be bent or have lost a balance weight. In that case, the imbalance will quickly damage the new bearing. A reputable shop checks driveshaft balance and U‑joint condition as part of the service.
Q4: How much does it cost to replace a driveshaft carrier bearing?
Costs vary by vehicle and region. In the U.S., average total cost is $374–$507 (parts $182–227, labor $191–280) as of 2026. In some other markets, a standalone bearing may cost $8–25, while a dealer‑required driveshaft assembly can exceed $400. Get multiple quotes from independent shops and driveline specialists.
Q5: Can I replace the carrier bearing myself?
Experienced home mechanics with a hydraulic press, bearing puller, and proper tools may attempt it, but it is not recommended for the average DIYer. Many factory bearings are pressed on and extremely tight. Improper installation (missing alignment marks, incorrect torque) can create worse vibration. Unless you have previous driveline experience, professional repair is a better choice.
Q6: Why did my new carrier bearing fail again so soon?
Possible reasons: 1) A worn or binding U‑joint was not replaced – its vibration destroyed the new bearing. 2) Incorrect installation – the bearing was not aligned properly or torque was uneven. 3) The driveshaft is bent or out of balance, or suspension modification changed the operating angle. 4) A low‑quality bearing was used. Always inspect U‑joints, driveshaft balance, and installation angles when replacing the carrier bearing. Use an OEM‑grade or reputable aftermarket part.
Q7: Why does the noise occur only at a specific vehicle speed?
This is a resonance phenomenon. At a certain speed (often 40–70 mph), the driveline reaches a frequency that excites the carrier bearing’s maximum vibration amplitude – the noise becomes prominent. Below or above that speed, vibration drops and the noise seems to disappear. This does not mean the problem is gone; speed‑specific resonance is a classic sign of carrier bearing wear.
Q8: Is increased driveline noise normal in 4WD mode?
On low‑traction surfaces (snow, mud, sand), some additional noise in 4WD is normal. However, using 4WD on dry, high‑traction pavement – or having mismatched tire sizes or wear between axles – creates “driveline binding” noise due to different wheel speeds. This is a characteristic of the 4WD system, not a bearing failure. Switch back to 2WD on dry pavement. If the noise remains obvious in 2WD at normal speeds, inspect the carrier bearing.
Q9: Do I need to rebalance the entire driveshaft after replacing the carrier bearing?
No, provided you followed the alignment mark procedure. But if the old bearing failed because of a bent shaft or missing balance weight, the imbalance remains and will damage the new bearing. A competent shop checks balance as part of the replacement service.
Q10: Why do different vehicles use different carrier bearing sizes?
Even within the same model, different engine, transmission, wheelbase, and load rating combinations can change the required bearing size. The critical dimension is the journal diameter where the bearing inner race sits. Always measure the journal diameter or verify the OEM part number before ordering. Ordering by year/make/model alone is not sufficient.


