When a truck or SUV vibrates at highway speeds or produces a humming noise from under the floor, many drivers first suspect tire imbalance or worn wheel bearings. But for vehicles with two‑piece driveshafts – common on rear‑wheel‑drive and four‑wheel‑drive pickups, vans, and long‑wheelbase SUVs – the actual cause is often a small but critical component: the driveshaft carrier bearing (also known as the center support bearing or hanger bearing).
This guide provides a complete, technician‑level overview based on manufacturer service bulletins (including Spicer driveline guidelines) and industry repair data from sources such as RepairPal and Oards. The information covers what a carrier bearing does, how to recognize when it is failing, how to replace it correctly, and what maintenance extends its life.
What Is a Driveshaft Carrier Bearing?
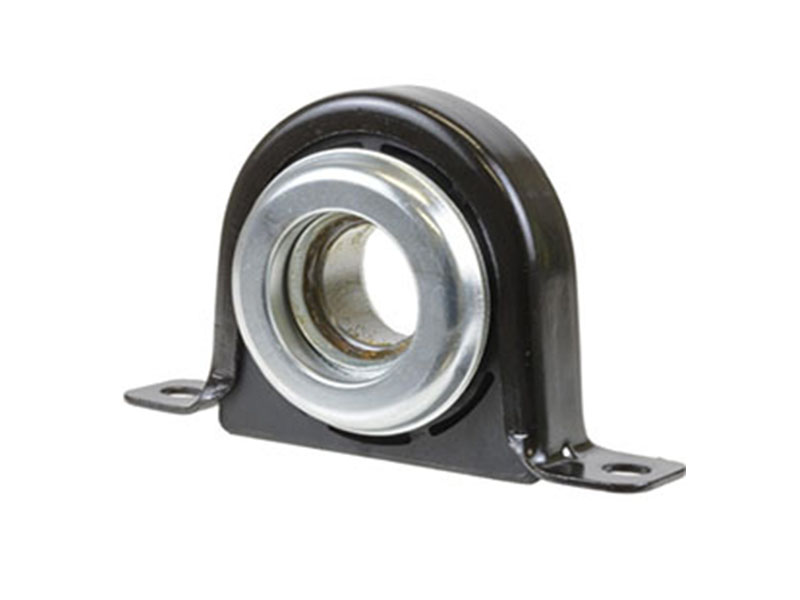
A driveshaft carrier bearing is a support bearing mounted between the two sections of a multi‑piece driveshaft. In vehicles with a long wheelbase, a single long driveshaft would be prone to “whipping” – a resonant vibration that occurs at certain rotational speeds. Splitting the driveshaft into two shorter sections and supporting the joint with a carrier bearing raises the critical speed threshold and keeps the shaft stable.
Alternative Names
The same component is called:
- Center support bearing – the most common service manual term
- Hanger bearing – older literature, especially for trucks
- Carrier bearing – aftermarket parts catalogues
All refer to the same assembly.
Core Functions
The carrier bearing performs three jobs:
- Maintains driveshaft alignment – prevents sagging or lateral runout
- Controls critical speed vibrations – suppresses the whipping tendency of long shafts
- Isolates driveline NVH – the rubber cushion absorbs vibration before it reaches the chassis
Typical Construction
A modern carrier bearing assembly consists of:
- A radial ball bearing (single‑row or double‑row) that supports the shaft
- A rubber isolator bonded around the bearing to dampen vibration
- A metal flange or bracket that bolts to the vehicle frame or underbody crossmember
Which Vehicles Have a Carrier Bearing?
Only vehicles with a two‑piece driveshaft use a carrier bearing. Examples include:
- Rear‑wheel‑drive trucks: Ford F‑150, Ram 1500, Chevrolet Silverado 1500, GMC Sierra
- SUVs with long wheelbases: Toyota Tacoma (certain configurations), Ford Expedition, Chevrolet Suburban
- Vans and some AWD crossovers with split drivelines
Short‑wheelbase cars with a single‑piece driveshaft (e.g. BMW 3‑Series, Chevrolet Camaro) do not have a carrier bearing.
Common Types of Driveshaft Carrier Bearings
1. Rubber‑Cushioned Center Support Bearing Assembly
The most common design in passenger cars and light trucks. The bearing is press‑fit into a rubber surround that is bonded to a metal flange. The assembly is sold as one unit and replaced as a whole.
2. Press‑Fit Radial Ball Bearing (Bearing Only)
Used on some heavy‑duty trucks and older vehicles. A bare bearing presses directly onto the driveshaft; a separate bracket or clamp holds it. The rubber damping may come from a separate component.
3. Double‑Row Bearings
Provide higher radial load capacity for heavy‑duty applications, such as commercial trucks or vehicles with large‑diameter driveshafts.
4. Sealed vs. Serviceable Bearings
- Sealed bearings are pre‑lubricated and require no maintenance – the standard for OE fitment.
- Serviceable bearings have a grease fitting – rare on modern cars but found on some older or heavy‑duty equipment.
5. Polyurethane Upgrade Bearings
Aftermarket units that replace the factory rubber isolator with polyurethane. They eliminate bushing deflection, providing more precise driveshaft alignment. The trade‑off is slightly increased NVH transmitted to the cabin. Popular for performance use or vehicles where the original rubber has failed repeatedly.
OEM vs. Aftermarket – How to Choose
Not all replacement carrier bearings are equal. The choice between OEM and aftermarket affects both cost and longevity.
- OEM bearings are made to the vehicle manufacturer’s exact specifications. They fit correctly and meet original NVH targets, but they carry a dealer price premium.
- Aftermarket bearings vary widely in quality. Premium brands use virgin rubber with good cold‑temperature flexibility and precision‑grade bearings. Their performance can equal or exceed OEM. Budget aftermarket bearings often use recycled rubber that becomes brittle and cracks within a short time, and their bearing tolerances may be inconsistent.
- What to look for: Choose a bearing from a reputable manufacturer (DUHUI, Spicer, Dana, NTN, Timken) that clearly states the rubber compound type and bearing grade. Avoid no‑name “universal fit” bearings.
Symptoms & Diagnosis: How to Tell If a Carrier Bearing Is Failing
Most carrier bearing failures develop gradually. Recognising the early signs allows you to replace the bearing before it damages u‑joints, transmission seals, or the driveshaft itself.
Common Symptoms
- Vibration at specific speeds – usually between 40 and 70 mph (64–113 km/h). The vibration is felt through the floor or seat, not the steering wheel. It is consistent at a given speed and does not change with road surface.
- Humming, droning, or growling noise – comes from under the centre of the vehicle. The noise increases with vehicle speed and may start faint then become loud.
- Shudder during low‑speed takeoff – a shaking sensation when accelerating from a stop that stops immediately when you release the throttle.
- Clunking when shifting gears – a sharp metallic clunk when shifting from Park to Drive or Reverse, or when suddenly applying power. This indicates the driveshaft is hitting the bearing housing because the rubber has collapsed.
- Rhythmic thumping under the seat – a “thump‑thump‑thump” felt through the seat bottom, typically worse under acceleration.
- Squealing or whining – high‑pitched noise that rises in pitch with speed. Suggests internal bearing wear (dry or damaged rollers).
- Visible rubber deterioration – cracks, sagging, or complete separation of the rubber isolator from the metal housing.
- Driveshaft visible movement – with the vehicle safely raised, you can push the driveshaft up and down near the centre support and see excessive play.
Differentiating from Other Problems
| Symptom location | Likely cause |
|---|---|
| Vibration through steering wheel | Tire imbalance |
| Noise from one corner, changes when turning | Wheel bearing |
| Vibration through seat/floor, centred under vehicle, speed‑specific | Carrier bearing |
| Vibration that stops when throttle released | Carrier bearing or u‑joint |
| Noise on rough roads only | Suspension or tires |
How to Diagnose (DIY Inspection)
With the vehicle safely lifted and supported:
- Push the driveshaft near the centre support. Any noticeable up‑and‑down play indicates bearing wear.
- Inspect the rubber isolator for cracking, flaking (dry rot), sagging, or separation.
- Check for grease leakage – a trail of grease around the bearing seal suggests internal damage.
- Rotate the driveshaft by hand (transmission in neutral). Feel for roughness, grinding, or uneven resistance. Use a mechanic’s stethoscope or a long screwdriver against the bearing bracket while turning – a rough bearing produces a clear grinding sound.
A professional shop will also check operating angles and run a dynamic balance test if vibration persists after bearing replacement.
Common Failure Mechanisms of Carrier Bearings
Understanding why carrier bearings fail helps you avoid repeat failures. There are three primary failure modes, often overlapping.
1. Bearing Wear, Contamination, or Internal Damage
The bearing itself is a precision component. Over time, normal cyclic loading can cause fatigue spalling on the raceways or balls. More often, contamination is the culprit – water, road salt, or fine grit penetrates through failed seals, turning the lubricant into an abrasive paste. Once the bearing begins to rough, it generates heat and noise, and eventually seizes or disintegrates.
2. Elastomer (Rubber) Isolator Deterioration
On many modern vehicles, the rubber isolator fails before the bearing. Heat cycling, exposure to road salts and oil (from engine or transmission leaks), and simple age cause the rubber to:
- Crack – allowing the bearing to move off‑centre
- Soften – the rubber no longer holds the bearing in the correct position
- Separate – the rubber pulls away from the metal flange, leaving the bearing unsupported
When the isolator fails, the driveshaft can move far beyond its design range. This rapidly wears the bearing itself and can damage u‑joints and seals.
3. Incorrect Driveline Operating Angles
Vehicles with lifted suspensions, lowered ride height, or damaged engine/transmission mounts often have excessive driveshaft angles. When the u‑joints operate at angles steeper than designed, they create a forced oscillation that loads the centre support bearing in directions it was not intended to handle. This dramatically shortens bearing life.
Professional Visual Inspection Indicators
Technicians look for:
- The ball bearing is no longer centred within the rubber isolator
- Visible cracks, dry rot, or separation between rubber and metal
- Grease seepage from the bearing seal
- The driveshaft yoke sitting off‑centre in the support hoop
Replacement Guide & Cost Analysis
Replacing a worn carrier bearing involves removing the driveshaft, pressing the old bearing off (for press‑fit designs) or unbolting the entire assembly, then installing the new one. This section outlines the professional procedure (based on industry‑standard repair guidelines from Spicer and RepairPal) and provides up‑to‑date cost estimates.
Preparation
- Tools needed: Floor jack and jack stands, socket set, torque wrench, bearing puller or hydraulic press (for press‑fit bearings), markers for alignment.
- Parts: New carrier bearing assembly (complete unit recommended). New fasteners are advised if the old ones were heated or are torque‑to‑yield.
- DIY time: 1.5–4 hours depending on vehicle and tool availability.
Professional Replacement Steps
- Safely lift and support the vehicle – the transmission should be in neutral, parking brake off.
- Mark the driveshaft – before disconnecting anything, use a paint marker or punch to mark the orientation between the front and rear driveshaft sections, the driveshaft and the differential flange, and the driveshaft and the transmission output yoke. This preserves factory balance.
- Remove driveshaft fasteners – unbolt the rear flange from the differential, then separate the slip yoke from the transmission.
- Remove the old carrier bearing – if it is a bolt‑on assembly, unbolt the bracket from the frame. For press‑fit bearings, use a hydraulic press or a puller to remove the bearing from the driveshaft.
- Clean and measure the mating surface – remove all rust, paint, and debris from the shaft where the new bearing will seat. Measure the shaft diameter to confirm the correct replacement bearing size.
- Install the new bearing – for press‑fit bearings, support the driveshaft properly and press the new bearing on evenly until it bottoms against the shoulder. Never hammer directly on the bearing.
- Reassemble – bolt the bearing bracket to the frame, reconnect the driveshaft sections aligning all marks. Tighten all fasteners to factory torque specifications.
- Final check and test drive – inspect for proper clearance around the driveshaft, then road‑test to confirm vibration is gone.
Special Alignment and Preload Requirements
- Matchmarking is critical – reassembly without aligning the original marks can cause imbalance that damages the new bearing within miles.
- Perpendicular isolator – the rubber isolator must sit perpendicular to the driveshaft centreline. An angled installation will cause rapid failure.
- Forward preload – some vehicles (e.g. BMW E28, certain Toyota trucks) require the carrier bearing to be shifted forward 4–6 mm before tightening. Consult the factory service manual.
- When to rebalance – if the original driveshaft was already unbalanced (vibration present before bearing failure) or if alignment marks were lost, professional dynamic balancing is recommended.
Non‑Serviceable Driveshafts
Some modern vehicles (especially models from 2015 onward) use a sealed, non‑serviceable centre support bearing that is bonded directly to the driveshaft. When the bearing fails, the entire driveshaft assembly must be replaced – cost typically $1,000–$2,800. A specialty driveline shop may be able to cut the old bearing off and weld on a serviceable replacement, but this is not a DIY job.
Recommended Concurrent Work
While the driveshaft is out:
- Inspect and lubricate or replace universal joints (u‑joints)
- Replace the transmission output shaft seal if it shows leakage
- Replace the differential pinion seal if necessary
- Use new fasteners (many manufacturers specify one‑time‑use bolts)
Replacement Cost Estimates (2026 Data)
| Cost Component | Estimated Range |
|---|---|
| Total (parts + labor) – independent shop | $300 – $600 |
| Labor cost | $190 – $280 |
| Parts cost (premium aftermarket) | $45 – $230 |
| DIY parts cost | $20 – $230 (varies by brand) |
| Full driveshaft replacement (non‑serviceable) | $1,000 – $2,800 |
| Premium polyurethane upgrade (e.g. JXB Performance) | $136 – $250 (parts only) |
Example vehicle costs (from RepairPal and YourMechanic):
- Ford F‑250: parts ~$45, labor ~$190
- Chevrolet Silverado 1500: parts ~$45, labor ~$228
Why early replacement saves money – ignoring a bad carrier bearing will eventually damage u‑joints, transmission output seals, and the differential. Repair costs can then exceed $1,000. Replacing the bearing at the first sign of trouble costs a fraction of that.
Maintenance Tips to Extend Carrier Bearing Life
Regular inspection and good driveline hygiene can more than double the service life of a carrier bearing.
Inspection Intervals by Use
- Highway / light duty – inspect once a year or every 12,000–15,000 miles
- Rough roads / off‑road – every 6 months or 6,000–8,000 miles
- Heavy towing / commercial use – every 3–4 months or 3,000–5,000 miles
Professional Diagnostic Checklist (DIY‑adaptable)
At each inspection:
- Hand‑rotation test – with the vehicle lifted and transmission in neutral, rotate the driveshaft by hand. Feel for any roughness, grinding, or “notchy” spots.
- Seal leakage check – look for fresh grease around the bearing seal. Leakage indicates seal failure and imminent bearing contamination.
- Centering check – the driveshaft should be centred in the rubber isolator. If the shaft is visibly off‑centre, the rubber has failed.
- Water shield inspection – the metal shield that protects the bearing from road spray must be present and undamaged. A missing shield drastically shortens bearing life.
General Best Practices
- Use high‑quality replacement parts – premium bearings with virgin rubber and precision races last 3–5 times longer than cheap alternatives.
- Maintain u‑joints – worn u‑joints create vibration that attacks the carrier bearing. Lubricate sealed‑for‑life u‑joints? (they cannot be lubed) – replace them when they show any play.
- Avoid chronic overloading – towing or carrying loads beyond the vehicle’s rating increases bearing load and accelerates wear.
- Address driveline vibrations immediately – a vibrating driveshaft (from imbalance or a bent shaft) will destroy a new carrier bearing in a few thousand miles.
- Protect from road salt – periodic undercarriage washing in winter reduces corrosion on the bearing and bracket.
DUHUI Bearing Recommendation
DUHUI Bearing manufactures precision automotive bearings and assemblies for passenger vehicles and light trucks. For driveshaft carrier bearings, DUHUI offers:
- OE‑equivalent dimensions and tolerances – each bearing is produced to match original manufacturer specifications for fit, runout, and load capacity.
- Premium rubber isolators – using virgin rubber compounds that resist cracking from temperature extremes and road chemicals.
- Sealed, pre‑lubricated designs – maintenance‑free operation for the service life of the bearing.
- Comprehensive fitment support – DUHUI can cross‑reference OEM part numbers or vehicle VIN to supply the correct carrier bearing assembly.
For professional repair shops and DIYers who want a reliable, cost‑effective alternative to dealer parts, DUHUI centre support bearings are a practical choice. Contact DUHUI’s technical team with your vehicle information or original part number for a fitment confirmation.
Conclusion
The driveshaft carrier bearing – also called the centre support bearing – is a small component with a large responsibility. It keeps the driveshaft aligned, controls critical‑speed vibration, and isolates driveline noise from the passenger cabin. Early signs of failure – speed‑dependent vibration, centre‑underbody humming, or clunking on gear shifts – should never be ignored. Replacing a worn bearing typically costs $300–$600 at an independent shop, or much less for DIYers with access to a press. Delaying replacement risks damaging u‑joints, seals, and the driveshaft itself, leading to repairs that can exceed $1,000.
Follow the inspection intervals and maintenance practices outlined above to maximise bearing life. For vehicles with non‑serviceable designs, be prepared for a full driveshaft replacement or seek a specialty driveline shop. When a replacement is needed, choose a quality part – DUHUI bearings provide OE‑grade fit and durability at a competitive price.
Frequently Asked Questions (FAQ)
Q1: Can I continue driving if my carrier bearing is bad?
A1: No. Driving with a failing carrier bearing allows the driveshaft to move excessively, damaging u‑joints, transmission output seals, and the differential. In extreme cases, the shaft can separate from the vehicle. Repair costs multiply quickly.
Q2: Does the driveshaft need to be rebalanced after carrier bearing replacement?
A2: Only if the original alignment marks were lost or the driveshaft was already out of balance before the repair. If you marked the shaft and reassembled in the exact same orientation, rebalancing is not required.
Q3: How long does a carrier bearing normally last?
A3: There is no fixed mileage. Under normal conditions, 50,000–150,000 miles. Rubber isolator degradation (from heat, cold, oil contamination, and age) often ends the bearing’s life before the bearing itself wears out.
Q4: Can I replace only the bearing and keep the old rubber isolator?
A4: On most modern vehicles, the bearing and rubber isolator are bonded together as a single non‑serviceable unit. You must replace the whole assembly. A few heavy‑duty or older designs allow separate replacement – check your vehicle’s service manual.
Q5: Will a bad carrier bearing damage my transmission?
A5: Yes. Severe carrier bearing failure causes violent driveshaft shaking that can break transmission output shaft seals, damage the output bearing, and even crack the transmission case.
Q6: Do all rear‑wheel‑drive vehicles have a carrier bearing?
A6: No. Only those with a two‑piece driveshaft. Short‑wheelbase RWD cars (e.g. sedans) use a single‑piece shaft and have no carrier bearing.
Q7: Do I need a hydraulic press to replace a carrier bearing?
A7: For press‑fit bearings, a hydraulic press is the correct tool. Some DIYers have succeeded using a large vice and careful tapping, but misalignment during installation will ruin the new bearing. A practical compromise: remove the driveshaft and take it to a machine shop ($20–$50) to press the bearing.
Q8: How can I tell carrier bearing noise from wheel bearing noise?
A8: Carrier bearing noise comes from under the centre of the vehicle and does not change when turning. Wheel bearing noise seems to come from a corner and changes pitch or intensity when you steer left or right.
Q9: Should I replace u‑joints at the same time as the carrier bearing?
A9: Yes. U‑joints and the carrier bearing share the same workload. While the driveshaft is out, inspect the u‑joints for any roughness or play. Replacing them together saves labour and prevents a future failure.
Q10: OEM or aftermarket – which is better for carrier bearings?
A10: Premium aftermarket bearings from brands like DUHUI, Spicer, or Timken are as good as or better than OEM at a lower price. Avoid cheap “universal” bearings with recycled rubber. Polyurethane upgrades are excellent for performance use but may increase cabin vibration (see cost table above for price references).
Q11: Can a carrier bearing be replaced at a general repair shop, or do I need a driveline specialist?
A11: A competent general repair shop can replace a bolt‑on carrier bearing assembly. For press‑fit bearings or vehicles with non‑serviceable shafts, a driveline specialist is a safer choice. Many shops sublet the pressing operation to a machine shop.
Q12: How long does the replacement take?
A12: Professional shop: 1–2 hours. DIY: 1.5–4 hours depending on tools and rust.
Q13: Where can I find the correct torque specifications for my vehicle?
A13: In the factory service manual (FSM). Torque values vary significantly. For example, some Toyota trucks require a specific “torque to 134 ft‑lb → loosen → retorque to 51 ft‑lb → stake the nut” procedure. Never rely on generic torque charts.
Q14: What is the trade‑off between a polyurethane upgrade and a standard rubber carrier bearing?
A14: Polyurethane bearings completely eliminate bushing deflection, keeping the driveshaft perfectly aligned at all times. They are virtually indestructible. The cost is increased noise, vibration, and harshness (NVH) – you will feel more road and driveline feedback in the cabin. Standard rubber bearings prioritise a quiet, smooth ride but have a finite service life (typically 5–10 years before rubber cracks).
End of Guide


