Quick answer: Should you grease a new U-joint before installing it? Yes—factory grease is for assembly and short-term protection, not long-term use. Grease it until you see fresh grease just starting to purge from all four seals, then stop. For old greaseable U-joints, grease regularly (every 5,000–8,000 miles for normal use). If grease won’t go in, the passage is clogged; if it leaks out immediately, the seal is ruptured—replace the joint. Use NLGI #2 EP lithium grease.
You’ve just bought a brand new set of U-joints for your driveshaft. They look perfect in the box. But a question nags at you: should you grease them before installation? And what about the old ones on your truck that have a grease fitting – you pump and pump, but nothing seems to happen. This uncertainty is incredibly common.
Knowing when and how to grease a universal joint is the difference between a smooth-rolling drivetrain and a catastrophic roadside failure. DUHUI will walk you through everything you need to know, from identifying your U-joint type to the proper greasing techniques that will maximize their lifespan.
Understanding Your U-Joints
Before you even pick up a grease gun, you need to know what you’re working with. Not all U-joints are created equal, and using the wrong maintenance strategy can ruin a perfectly good component.
The Two Main Types of U-Joints
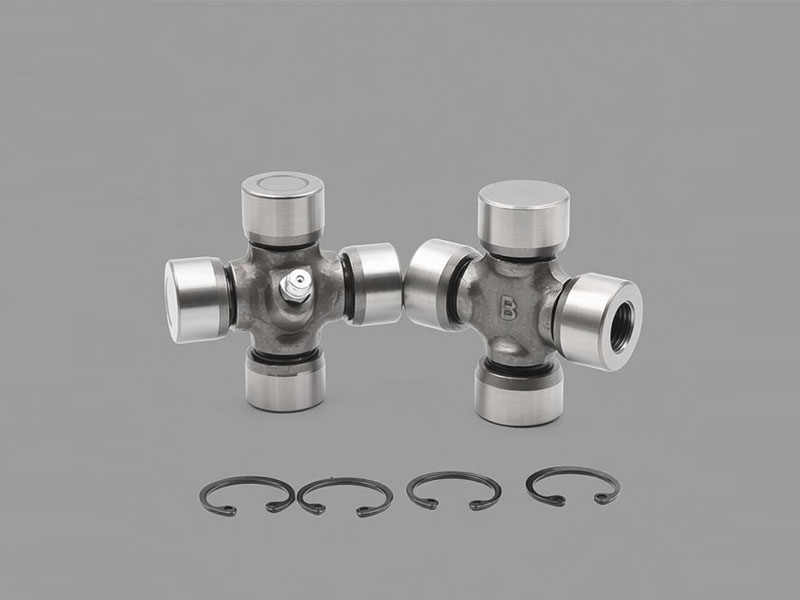
Permanently Lubricated (Non-Greaseable)
These U-joints are designed as sealed, maintenance-free units. They are packed with lubricant and sealed at the factory.
- Visual Identification: They have a smooth exterior on the bearing caps and do not have a grease fitting (also known as a Zerk fitting).
- Common Misconception: Many people think “sealed for life” means they will last forever. In reality, it means the life of the seal is the life of the joint. Once the factory grease degrades or the seal is compromised, the joint must be replaced; it cannot be serviced.
Greaseable (Serviceable)
These U-joints are built with internal channels that allow you to add fresh grease periodically. This helps push out old, contaminated grease and keeps the bearings lubricated.
- Visual Identification: They feature a clearly visible grease fitting (Zerk) on the cross shaft or one of the caps.
- Maintenance: They require regular greasing to prevent wear and extend their service life.
How to Identify Which Type You Have
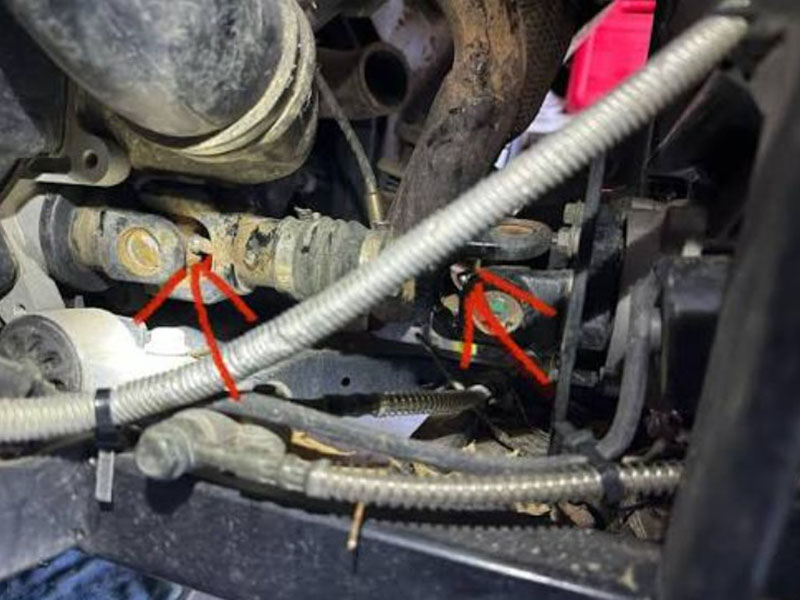
The easiest way to tell is a simple visual inspection. Safely get under your vehicle and look at the U-joints on the driveshaft. Do you see a small metal nipple, usually angled out from the center or a cap? If yes, you have greaseable U-joints. If the caps look smooth and sealed, you have permanently lubricated ones. When in doubt, always consult your vehicle’s service manual.
The Definitive Greasing Guide
Now, let’s get to the heart of the matter. Here is exactly how to handle both new and old U-joints.
How to Grease New U-Joints
Even though they are new, if you have purchased greaseable U-joints, you absolutely should grease them before installation.
The “Why”: The grease packed in a new U-joint at the factory is primarily for assembly and short-term corrosion prevention. It is not designed for the extreme pressures and high temperatures of operation. It often doesn’t fully fill the bearing journals. By greasing them immediately, you:
- Ensure every needle bearing is coated in protective lubricant.
- Displace any air pockets that could cause “air lock” and prevent grease from reaching the bearings later.
- Introduce a high-quality grease with Extreme Pressure (EP) additives that can handle the real-world loads.
Step-by-Step:
- Clean: Wipe the grease fitting with a clean rag to prevent you from forcing dirt into the bearing cross.
- Attach: Firmly connect the coupler of your grease gun, loaded with a quality EP lithium grease, onto the fitting.
- Pump Slowly: Apply slow, steady pressure on the grease gun. You are not just adding grease; you are filling the internal cavities.
- Observe the Seals: Continue pumping until you see fresh grease just begin to purge from all four bearing seals (the tiny gaps between the cap and the cross).
- Stop & Clean: Stop immediately. Any more grease will increase internal pressure and risk blowing out the seals. Wipe away the purged grease.
How to Grease Old U-Joints
Greasing old U-joints is as much about inspection as it is about lubrication.
The Operation:
- Prepare: Safely lift and support the vehicle. Locate all the grease fittings on the driveshaft (there are often two per U-joint).
- Clean & Connect: Clean the fitting and attach your grease gun.
- Pump & Observe: Slowly pump grease while watching the U-joint seals.
Key Warning Signs:
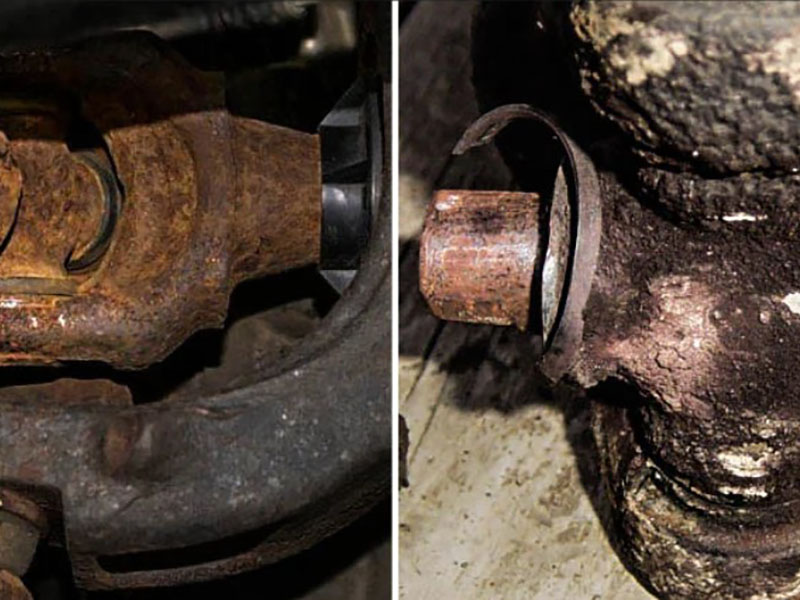
Problem: Grease Won’t Go In.
This is a classic sign of a blockage. The internal passages are likely clogged with hardened, old grease or debris. Do not force it with a high-pressure grease gun, as this can blow the seals. If the U-joint isn’t making noise yet, you might get lucky, but this usually means its service life is limited and replacement is the only reliable fix.
Problem: Grease Goes In, But Immediately Leaks Out.
This is a definitive sign of failure. If grease pushes out from around the cap or seal as soon as you start pumping, the internal seals are ruptured or the bearing cap is worn. This U-joint must be replaced immediately. Continued driving could lead to the driveshaft coming apart.
Expert Recommendations for Maximum U-Joint Life
Knowing how to grease is one thing; knowing the finer details is what separates a pro from a DIYer.
Choosing the Right Grease
Don’t just grab any grease gun. For U-joints, you need a high-quality grease with Extreme Pressure (EP) additives. Look for a lithium-based or polyurea-based grease specifically formulated for chassis and universal joint applications. A common and excellent choice is an NLGI #2 grade EP lithium complex grease. Crucially, avoid mixing different types of grease (like lithium with calcium complex), as they can be chemically incompatible and harden, leading to blockages.
The “Goldilocks” Zone: How Much is Enough?
The goal is not to pack the U-joint full until it can’t hold any more. The goal is to purge the old, contaminated grease and ensure all bearings are coated. Grease until you see fresh material emerge from all four seals, then stop. Over-greasing creates excessive internal pressure, which can rupture the seals and allow contaminants to enter, actually shortening the life of the joint.
Recommended Maintenance Schedule
- Normal Use: For a daily driver, greasing your serviceable U-joints every 5,000 to 8,000 miles is a good rule of thumb. A simple way to remember is to do it every time you change your oil.
- Severe Use: If you frequently go off-roading, tow heavy trailers, drive through deep water, or operate in dusty conditions, you should inspect and grease your U-joints much more frequently—perhaps every 1,000 to 2,000 miles. Water is especially harmful as it can wash away grease and cause rapid rust.
Inspecting During Greasing
Make your greasing session a mini-inspection.
- Listen: Have you noticed any squeaking, clunking, or vibration from the driveline, especially when accelerating or decelerating? This is a major red flag.
- Look: While you’re under the vehicle, visually inspect the U-joints. Look for rust trails from the bearing caps, loose or missing needle bearings, or any physical damage. If you see any of these, replacement is the only safe option.
Conclusion
Proper U-joint maintenance boils down to a simple formula: grease new serviceable joints before installation to prepare them for work, regularly maintain old ones to extend their life, and know when to stop greasing and start replacing. By following these guidelines, you ensure a safer, more reliable vehicle and avoid unexpected breakdowns.
Using quality components is the foundation of this reliability. Whether you’re servicing your current drivetrain or building a new one, choosing high-precision parts matters. At DUHUI Bearing, we manufacture durable, precision-engineered U-joints and a full range of bearings to meet your exact specifications.


