Quick answer: How do you properly replace a wheel hub bearing? The process depends on the bearing type. Gen1 press-fit bearings require a hydraulic press; Gen2 and Gen3 bolt-on units are simpler—unbolt the old and bolt on the new. Critical steps: clean surfaces, torque the axle nut to spec using a torque wrench, and protect the ABS sensor ring. A pro takes about 0.5–1 hour per wheel. Proper installation is key to longevity.
Wheel hub bearings are important for car safety, ride comfort and control accuracy. When you have a worn or damaged wheel hub bearing, this can result in unusual sound, irregular tire wear, vibration and even complete separation of the wheel in extreme cases. To all the technicians, distributors, and DIYer, learning how to properly replace a wheel hub-bearing has to be one of the basic skills.
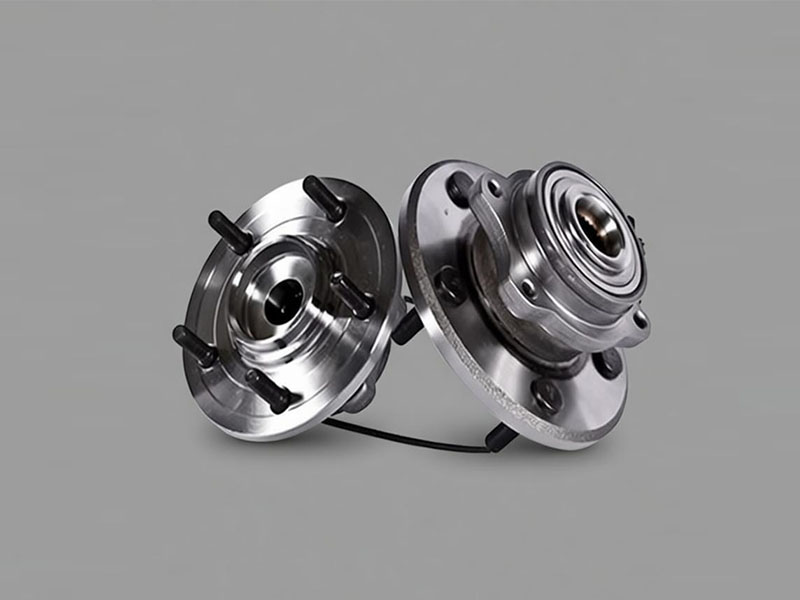
DUHUI is a professional manufacturer of wheel bearings, which has been in production for more than 20 years and exporting since 15 years ago. We hope to help you with the replacement process in a safe, efficient and proper way.
Is Wheel Hub Bearing Difficult to Replace?
The replacement of the wheel hub bearings is not complicated, but it requires knowledge of mechanics, proper tools, and care in operation. The process has a definite sequence but the problems that are normally witnessed are in the form of rusted bolts or nuts, hard hubs, and poor installation of the previous one. They can render the task more difficult.
Understanding the type of bearing you have can help. Most modern cars use integrated hub units, which have evolved through generations:
Gen1: Typically consists of double-row roller or ball bearings that are pressed in separately.
Gen2: Features an integrated flange on the outer race for easier mounting.
Gen3: Integrates the bearing unit with the ABS sensor ring.
The wheel hub bearing may be replaced by technicians and DIYers as per the guidelines provided in the service manual of the car. Nonetheless, the installation should be done correctly because improper installations, improper force applications and improper lubrication will greatly shorten the life of the bearing. Installing a high-quality wheel hub bearing assembly made by DUHUI can minimize the installation risk and provide constant performance after the installation.
If you lack knowledge about suspension or braking systems or do not have professional tools, we highly recommend you to work with a professional mechanic. Correct fitting of WHB systems will not not only provide you with a long service life and driving safety.
Precautions for Replacing Wheel Hub Bearings
Before replacing wheel hub bearings, you have to know: Any error during removal or installation will damage them. The damage may not be apparent but will reduce its life. These suggestions are based on actual production and field experience.
Wheel Hub Bearings Removal Tips
During removal, you need to use the right Wheel Hub pullers that are compatible with the size and shape of the bearing. Do not hit bearings with a hammer since it may distort the races, damage the knuckle or unbalance the hub. Removal power application is done uniformly and systematically so that other parts are not damaged and removal is not difficult.
Disassemble slowly using uniform force. Do not put side load on rolling elements or bearing cages, because this may damage the parts that may need to be reused or inspected. Also ensure that the working area is clean and organized before beginning. Clean surroundings minimize the possibility of contamination and allow you to observe the pattern of wear or unusual damage correctly.
Wheel Hub Bearings Installation Tips
Installation is done properly after thorough cleaning. Old grease, metal shavings, and contamination should be cleaned off the hub, knuckle, and mating surfaces using clean kerosene or gasoline. Tiny particles can contribute to early failure of the bearings.
PRO TIP: Operate in a clean environment. Even microscopic dust particles invisible to the naked eye can increase bearing wear, vibration, and noise if they enter the bearing. Do not open the inner packaging of the new bearing until you are ready to install it.
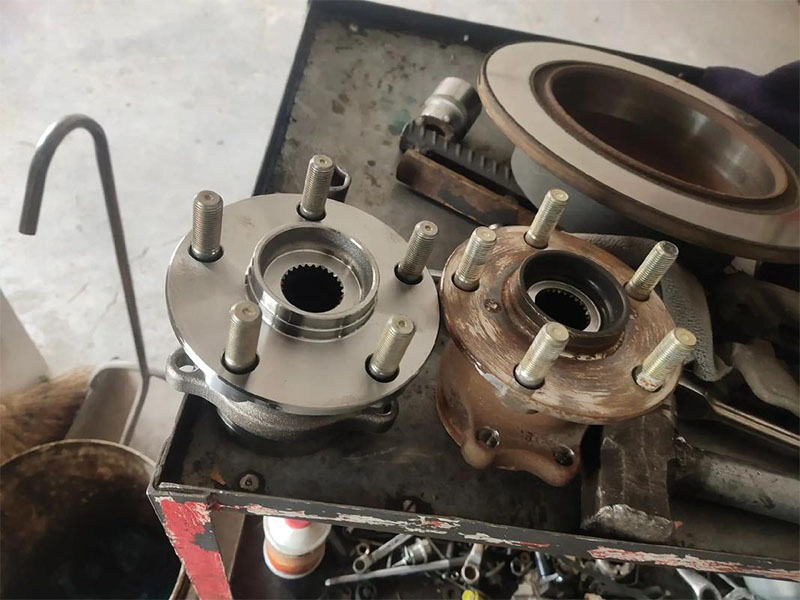
Prior to installation, make sure that the new bearing is identical to the old one in size, structure, and weight rating. At DUHUI Bearing, all the wheel hub bearing units are subjected to dimensional and performance tests to ensure that they conform to the OEM specifications, but installation should still be verified.
Make sure you use a special tool to do the pressing of the bearing. Make sure to apply the load in an even fashion on the right surface of the bearing. CRITICAL: The pressing force must be applied to the correct ring. When pressing a Gen1 bearing into a housing (knuckle), force must be applied to the outer ring’s end face. When pressing it onto a shaft, force must be applied to the inner ring’s end face. Never apply force through the rolling elements. Once fitted, slight rolling of the bearing should be used to ensure that it is free rolling, smooth, silent and has no roughness.
It should be greased properly with the recommended grease to reduce friction and heat. IMPORTANT NOTE ON GREASE: Many modern hub bearings are sealed for life and do not require regreasing. However, non-sealed bearings (like some Gen1 double-row tapered roller bearings) must be lubricated. Since internal cavity sizes vary, a general rule is that the grease quantity should fill about half of the bearing’s internal clearance during installation. Too much grease will be pushed out during rotation.
In case of larger bearings or assemblies that are tightly fitted, an oil bath may be necessary to heat. The heating should be controlled at approximately 80°C to prevent variation of material properties. Once installed, note down the replacement details to be used in future maintenance and conduct a final check of the safety aspects.
EXPANDED PROFESSIONAL PRECAUTIONS:
Handle ABS Components with Extreme Care: For Gen3 bearings with an ABS magnetic ring, this ring is fragile. It must not be subjected to impact, collision, or contact with other magnetic fields (e.g., from power tools). To identify which side has the magnetic ring, bring a small steel object close to the bearing edge. During installation, the side with the magnetic ring MUST face inward, directly opposite the ABS sensor. Incorrect installation will cause ABS malfunction.
Torque is Law: When installing the lock nut, always use a torque wrench and follow the manufacturer’s specifications precisely. Different bearing types and applications require different torque values. Do not use an impact wrench for final tightening.
Never Disassemble a Unit: Do not attempt to disassemble a sealed wheel hub bearing or adjust its seals. This will damage the seal and lead to rapid failure.
Prevent Corrosion: When handling bearings with bare hands, wash off sweat and apply a high-quality mineral oil to prevent corrosion, especially in humid conditions.
How to Remove an Automotive Wheel Hub Bearing?
1). Securely park the car on a jack, loosen the bolts on the tire, and pull the tire off with force.
2). Remove the brake caliper and brake disc. The brake caliper should be supported on the control arm and should not be left hanging freely to avoid damage to the brake hose due to its weight.
3). Remove the cover plate and bearing nut, please refer to the car manufacturer specifications for a more detailed installation method of the nut.
4). As for the WHB with ABS sensor, please interrupt connection of ABS sensor first, and at same time interrupt ABS cables from fixed buttons. Please make a careful check for the location of the WHB before removing ABS, it’ll make it easier to find the right ABS connection position when installing a new WHB.
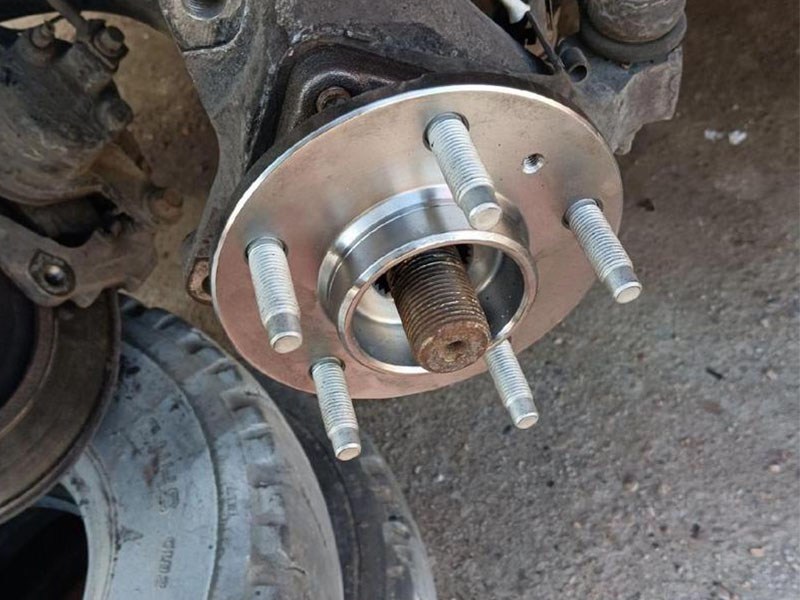
5). Loosen the bolts connecting the WHB to the steering knuckle. You will need pliers to pull the hub unit off the axle, then also pull the steering knuckle out of your car. Be careful not to damage the steering knuckle and axle, and also note how the splash guard is installed between the hub unit and the steering knuckle so that it can be reinstalled in the correct position when fitting the new hub unit.
6). Clean and inspect the steering knuckle. Before installation, carefully inspect all mating surfaces for damage, wear, or burrs, and clean them thoroughly.
How to Install an Automotive Wheel Hub Bearing?
1). Arrange the ABS sensor wiring harness, splash guard, and bearing splines in their original positions. Align and install the hub unit onto the steering knuckle, positioning it centrally on the drive axle shaft. Push the hub unit firmly onto the shaft, ensuring that the ABS wiring harness and connector are aligned in their original location. Note: Do not cause any damage to the splines during installation. Do not strike the hub unit with objects such as a hammer, as this may damage the hub unit.
INSTALLATION VARIATIONS BY BEARING TYPE:
For Gen2 & Gen3 Hub Bearings: The installation primarily involves correct placement and torquing of the axle nut. Ensure the unit is seated squarely.
If a Press is Unavailable: For some applications, a fitting sleeve and hammer can be used. Hammer blows must be transmitted evenly through the sleeve to the entire circumference of the correct bearing ring end face. Direct hammering on the bearing is forbidden.
2). Use a torque wrench to install the nuts, and use a wrench to tighten the nuts on the steering knuckle.
3). If the vehicle is equipped with an ABS sensor, reconnect the wiring harness to its correct position and secure it with clips to the frame area.
4). Use a torque wrench to tighten the nuts. Do not use an impact wrench.
5). Install the brake disc and brake caliper in their original correct positions, ensuring that all parts are free of burrs and debris.
6). Install the wheel nuts and tighten them securely.
POST-INSTALLATION CHECK: After installation, the wheel should rotate smoothly and flexibly with no jamming or rough spots. The axis of the installed bearing must align with the axle. Misalignment causes extra load, noise, and early failure.
Why is Bearing Quality Important?
Installation will not be able to correct a poor bearing. The wheel hub assemblies at DUHUI are manufactured with superior materials and are tested and manufactured to last a long time. They are comparable to international standards in addition to being laboratory and road tested. This reduces the problems associated with installation and subsequent failures.
If you desire dependable wheel hub bearings that fit easily and function correctly, you need to select the proper manufacturer, just as you need to apply the proper replacement procedure.
FAQs about Wheel Hub Bearing Replacement
When should I replace my wheel hub bearing?
A wheel hub bearing needs to be checked and replaced when any of the following failure signs are observed: A whirring or grinding sound that accelerates with speed; unusual vehicle vibration; uneven tire wear; a loose steering feel when turning; or an illuminated ABS light. Regular inspection is key. It is also recommended to check bearings when servicing the brake system.
Can I replace the bad wheel hub bearing by myself?
The wheel bearing unit is pre-assembled. If you have basic mechanical experience and the right tools, you can replace the wheel bearing yourself. But it is necessary to follow the instructions very carefully and be patient. The installation process should be exact. If you have any doubts, consult a professional. For front wheels, it is often recommended to replace bearings in pairs, as both sides endure similar conditions.
How long does it take to replace a wheel hub bearing?
At a repair shop, it typically takes 0.5~1 hours per wheel. DIY time varies based on tool availability, rust conditions, and vehicle design.
Do I need special tools to replace a wheel hub bearing?
Yes. You need proper bearing pullers, press tools, torque wrenches, and sometimes heating equipment. Using incorrect tools can damage the bearing or hub assembly. High-quality pre-assembled wheel hub bearings are easier to install.
Should wheel hub bearings be lubricated during installation?
Yes. Lubrication is important to reduce friction, heat, and wear. Always use the manufacturer-recommended grease. However, note that many modern sealed hub units are lubricated for life and require no additional grease during installation.
What happens if a wheel hub bearing is installed incorrectly?
Incorrect installation can lead to abnormal noise, vibration, excessive heat, uneven load distribution, and premature failure. In extreme cases, it may lead to wheel looseness or loss of vehicle control.
Is it better to replace the bearing or the complete wheel hub assembly?
In many modern vehicles, replacing the complete wheel hub bearing assembly is more efficient and reliable. Pre-assembled units reduce installation error, save time, and ensure correct bearing preload. This is especially recommended for vehicles with integrated ABS sensors.
What is the life expectancy of a good wheel hub bearing?
A good quality wheel hub bearing should last 100,000-150,000 kilometers under normal circumstances. Lifespan is also determined by load, road quality, installation accuracy, and manufacturing quality.
Does the bearing quality affect the installation and service life?
Yes. Precision production, high-quality materials, and heat treatment directly affect performance and life. Professionally manufactured bearings provide easier installation (due to precise tolerances), less noise, and longer service compared to low-quality bearings.
Should I replace all 4 wheel hub bearings?
Usually, only the worn or damaged bearing is replaced unless your vehicle has very high mileage or shows widespread wear. Replacing all four is not required by standard service procedures. However, if the vehicle has exceeded 100,000 miles and one bearing has failed, it is often recommended to replace bearings on the same axle to avoid redundant labor costs and ensure balanced performance. A full four-corner replacement should be based on diagnostic evidence rather than precaution alone.
Is it necessary to replace the axle nut or bolts during replacement?
Yes, most manufacturers require replacement of the axle nut because it is a torque-to-yield fastener that loses its clamping force after removal. Mounting bolts should also be inspected; if they show corrosion or thread damage, replacement is recommended. Always use new fasteners when specified in the vehicle service manual.
Why does my ABS light come on after replacing a wheel hub bearing?
The ABS warning light may activate if the wheel speed sensor or magnetic encoder ring is damaged during installation, if the sensor is not properly connected, or if the new bearing is not seated correctly. For integrated sensor designs, ensure the sensor gap is within specification. Clearing the fault code after a road test is typically required.
What torque specifications are critical when replacing a wheel hub bearing?
The axle nut torque is the most critical specification, as it sets the bearing preload. Under-torquing can cause wheel looseness and rapid bearing wear, while over-torquing can damage the bearing internally. The wheel hub mounting bolts and brake caliper bolts must also be torqued to manufacturer specifications to ensure safe operation.
How long does a new wheel hub bearing typically last?
A quality replacement bearing, when installed correctly with proper torque, typically lasts between 80,000 and 150,000 miles under normal driving conditions. Service life can be reduced by factors such as oversized wheels, frequent off-road use, water intrusion, or improper installation.
Can I use a used or salvaged wheel hub bearing?
Using a used wheel hub bearing is not recommended. Wheel bearings undergo progressive wear and may have unseen internal damage, corrosion, or encoder ring defects. A used bearing also lacks a warranty and provides no reliability data, making it a risk for premature failure and repeated labor costs.
Do I need an alignment after replacing a wheel hub bearing?
Replacing a wheel hub bearing does not alter the vehicle’s steering or suspension geometry in most vehicles, because the bearing is mounted to a fixed knuckle. However, if the replacement involved removing the steering knuckle, loosening control arms, or if the vehicle showed uneven tire wear prior to the repair, an alignment check is advisable.


